Table of contents
- Introduction
- Unpacking CI/CD
- Prerequisites
- Knowledge and Skills
- Tools
- Project in Focus
- Selecting a CI/CD Tool
- Setting up Continuous Integration: Step-by-Step
- Step 1: Understand Your Project's Requirements
- Step 2: Choose Your CI/CD Tool
- Step 3: Configure Your CI Pipeline
- Step 4: Monitor and Adjust Your CI Process
- Real-time Example: CI in Action
- Setting up Continuous Deployment: Step-by-Step
- Monitoring and Troubleshooting your CI/CD Pipeline
- Best Practices for a Robust CI/CD Pipeline
- Wrap Up
- Further Resources
Introduction
As modern software development trends lean towards continuous development and Integration, effective code review strategies have emerged as a crucial element of the development lifecycle. Code review, in its simplest form, refers to the process of checking another developer's code for mistakes, bugs, or improvements. While it might appear as a simple task, effective code reviews require a delicate balance between thoroughness, efficiency, and collaboration.
This guide helps you understand code reviews better and gives you useful tips to improve how you do them. No matter if you're an experienced developer, a new coder, or a project leader, the ideas in this guide will give you a strong way to do code reviews that makes the code better, helps your team work together, and finishes projects faster.
Through the sections of this guide, we'll explore why code reviews are vital to software development, the best practices to adopt, common pitfalls to avoid, and how to leverage modern tools and platforms to streamline the review process. Each section is replete with real-world examples and step-by-step instructions to help ground these concepts into everyday coding and review scenarios.
Embark on this journey to optimize your code review strategies, foster an environment of constructive feedback, and elevate the quality of your code and software solutions. Let's dive in!
Unpacking CI/CD
Understanding the fundamentals of Continuous Integration and Continuous Delivery (CI/CD) is crucial for a seamless code review process. This section will explore the basic concepts of CI/CD and its role in enhancing software development.
Continuous Integration (CI)
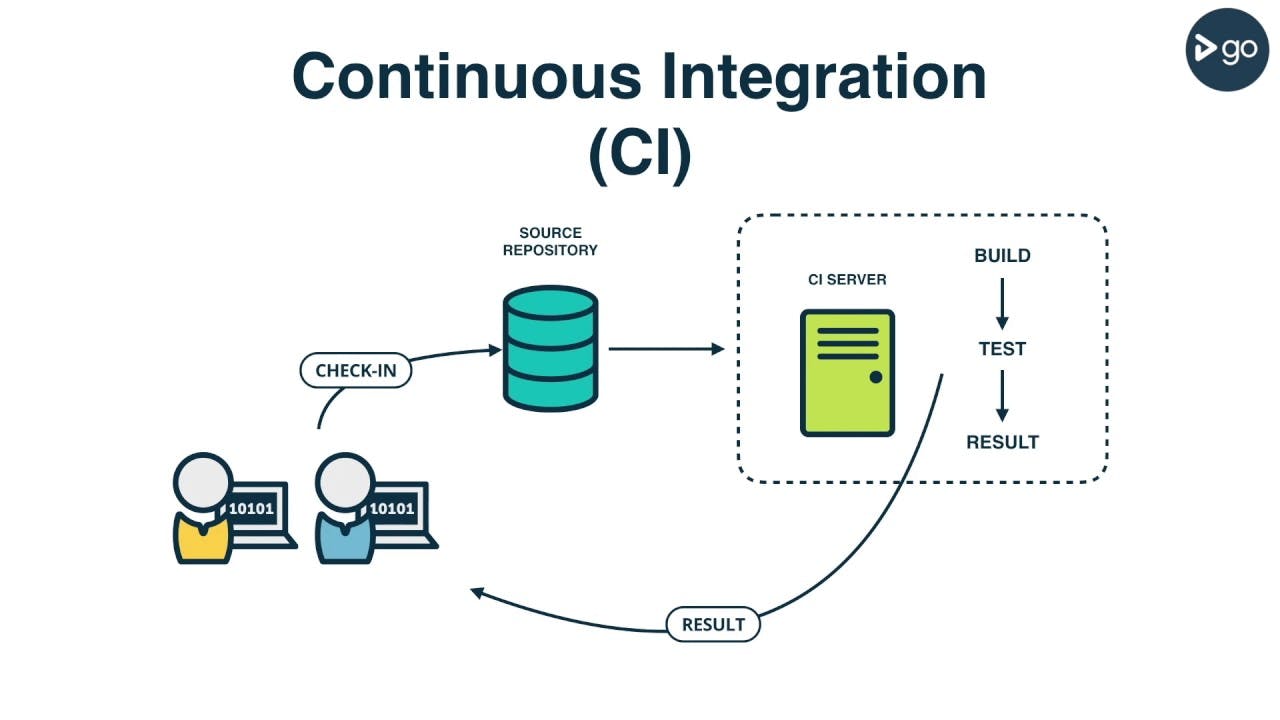
CI is a development practice that involves regularly integrating code changes into a shared repository. Developers often merge their changes multiple times a day, leading to frequent commits. The primary goal here is to catch and address conflicts early rather than letting them pile up, resulting in a dreaded integration hell.
Each Integration is verified through an automated build, which allows the team to detect problems swiftly. The major advantages of CI include improved developer productivity, higher code quality, and faster iteration time.
Here's an example of a simple CI process:
Developers write code and unit tests for their features.
They commit the changes to their local repository.
The changes are then pushed to the shared repository.
The CI server automatically builds the system and runs unit and integration tests.
The team is notified of the successful Integration or failure.
Continuous Delivery (CD)
While CI focuses on integrating and frequently testing code, CD is an extension that ensures all the changes are deployable. It automates the release process to deploy new changes to end users as quickly as possible.
The CD process includes the following:
A developer commits changes to the version control repository as part of the Continuous Delivery process, automating the release process to deploy changes to end users quickly.
The Continuous Integration (CI) server autonomously constructs the system and executes the necessary tests to ensure optimal functionality.
Upon successful completion of the tests, the Continuous Integration server seamlessly deploys the application to a designated staging environment.
The application in the staging phase is subjected to various tests.
When the CI server confirms that all tests have successfully passed, it prepares the application to be deployed in a production environment.
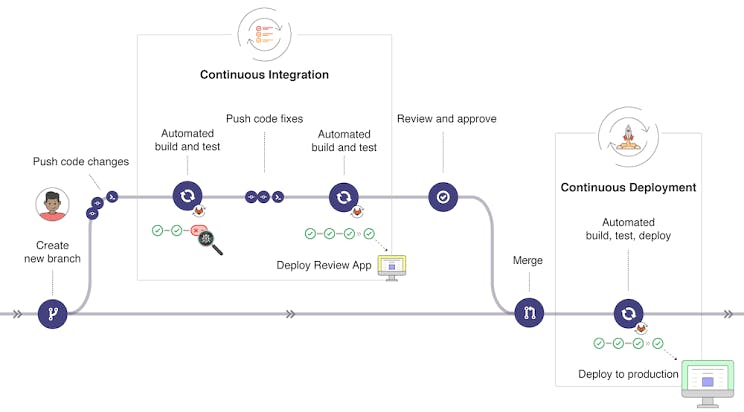
At this point, it would be beneficial to visualize a typical CI/CD process flow.
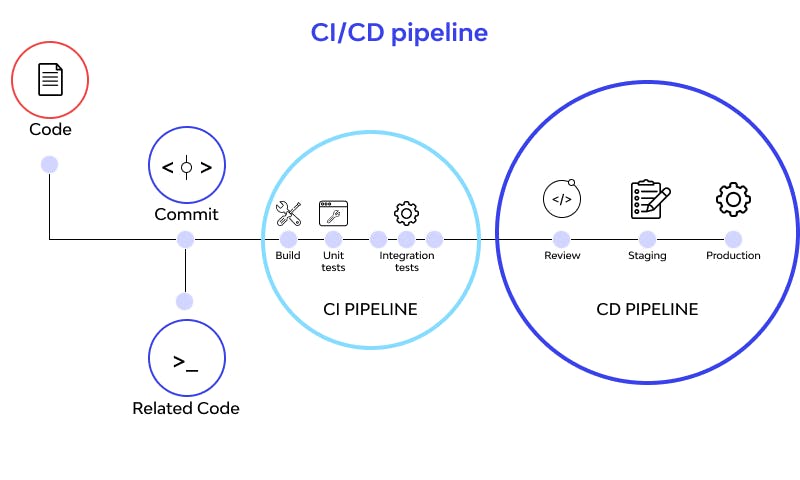
Understanding and implementing CI/CD practices reduces the team's manual effort and facilitates a more efficient and productive code review process.
Prerequisites
Before diving into the implementation of a code review process using CI/CD, there are several prerequisites you must ensure to have in place. These tools and knowledge areas are fundamental for the seamless execution of the process.
Knowledge and Skills
Version Control Systems (VCS): Familiarity with version control systems, such as Git, is crucial. You should understand how to commit code changes, create branches, and merge code.
Basic Programming Knowledge: A basic understanding of programming concepts is necessary since you'll be working with code. You don't need to be an expert, but you should be able to understand what the code is doing.
Understanding of CI/CD: As discussed in the previous section, an understanding of CI/CD practices is essential.
Tools
Code Repository: A shared code repository is required for collaboration. Platforms such as GitHub, Bitbucket, or GitLab can be used.
CI/CD Tool: A CI/CD tool is necessary to automate the build, test, and deployment processes. There are many tools available such as Jenkins, Travis CI, CircleCI, or GitLab CI/CD.
Code Review Tool: A code review tool helps facilitate the review process. Some code repository platforms, like GitHub, have built-in code review tools. Other options include Review Board.
Test Environment: A test or staging environment is needed to test changes before they are deployed to production.
Project in Focus
For this guide, we'll be using a JavaScript-based web application as the project in focus. You should have a basic understanding of JavaScript and its related technologies. However, the principles and steps discussed in this guide can also apply to projects written in other languages.
With these prerequisites in place, you're ready to start implementing a streamlined code review process using CI/CD.
Selecting a CI/CD Tool
Selecting the right CI/CD tool is crucial for achieving an effective and efficient automated process. Several popular tools are available today, each with its strengths and weaknesses. In this section, we'll quickly examine some of the leading options before announcing our pick for this guide.
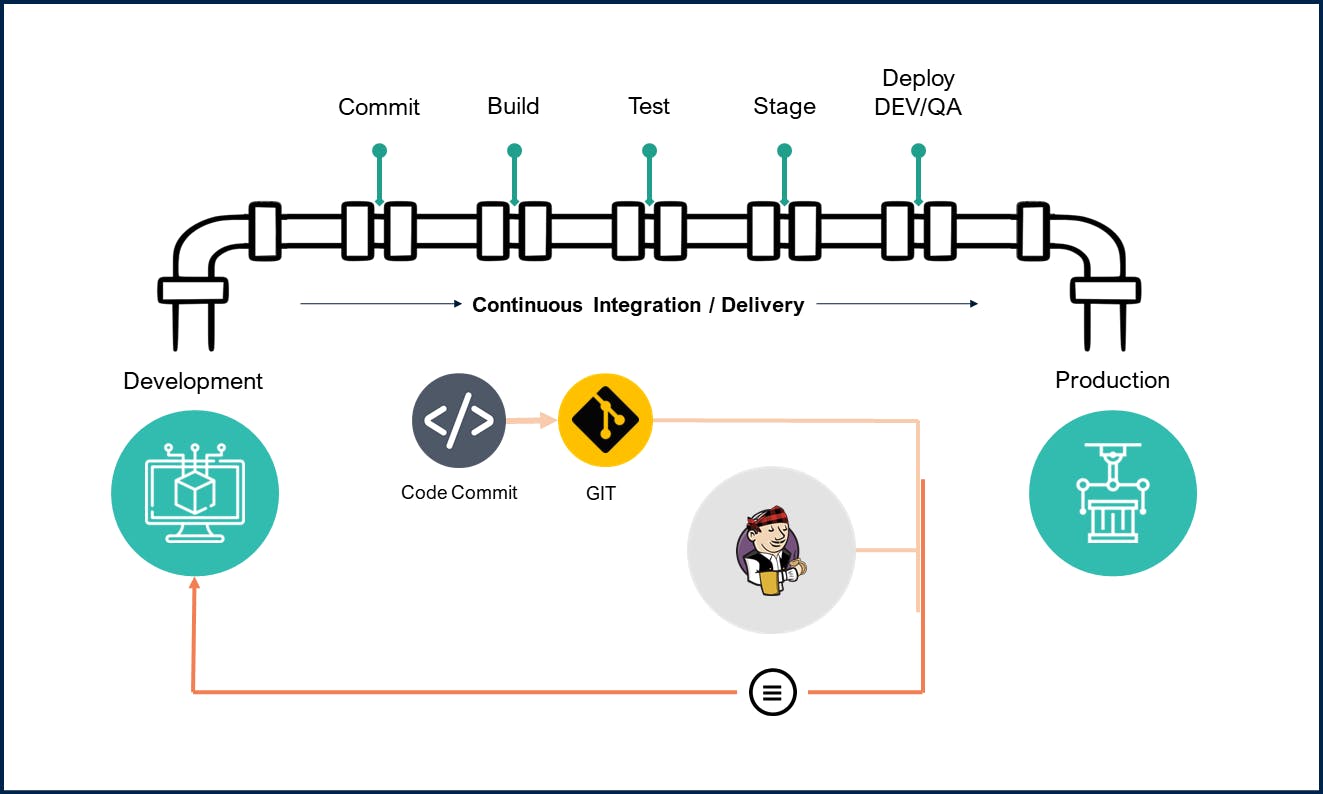
Jenkins: An open-source automation server, Jenkins is one of the industry's oldest and most respected CI/CD tools. It's highly configurable, allowing you to set up the perfect pipeline for your project. The trade-off, however, is that it can be quite complex and daunting for beginners.
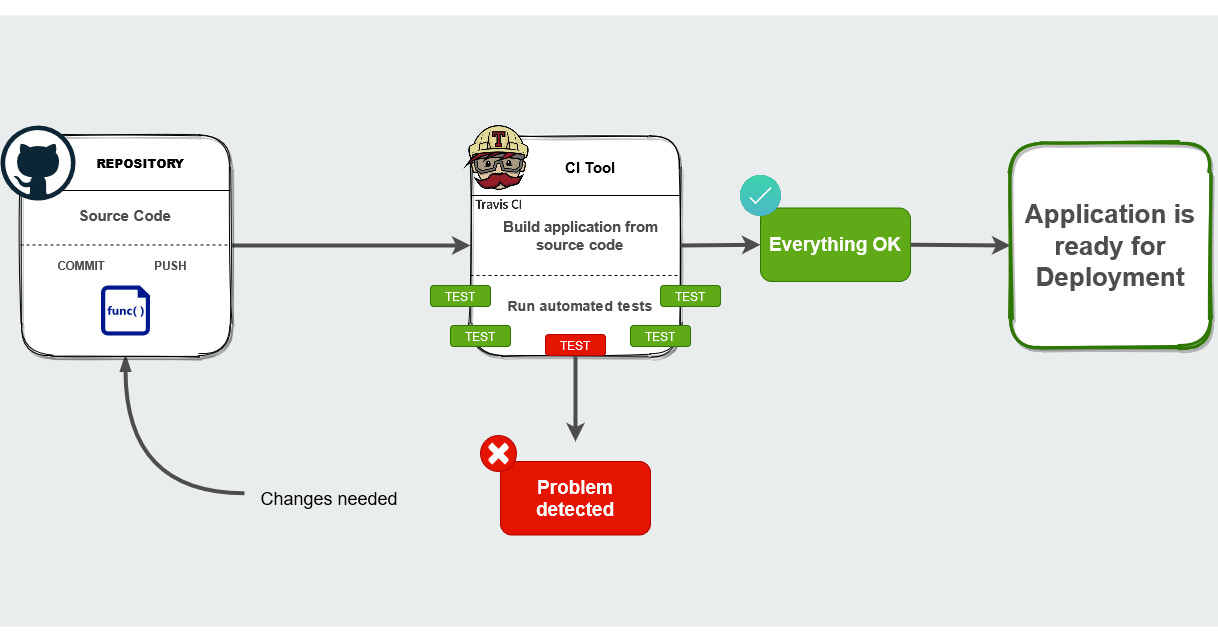
Travis CI: This tool is a popular choice for open-source projects. It integrates seamlessly with GitHub and offers a clean, straightforward configuration process. However, for private repositories, it can get a bit expensive.
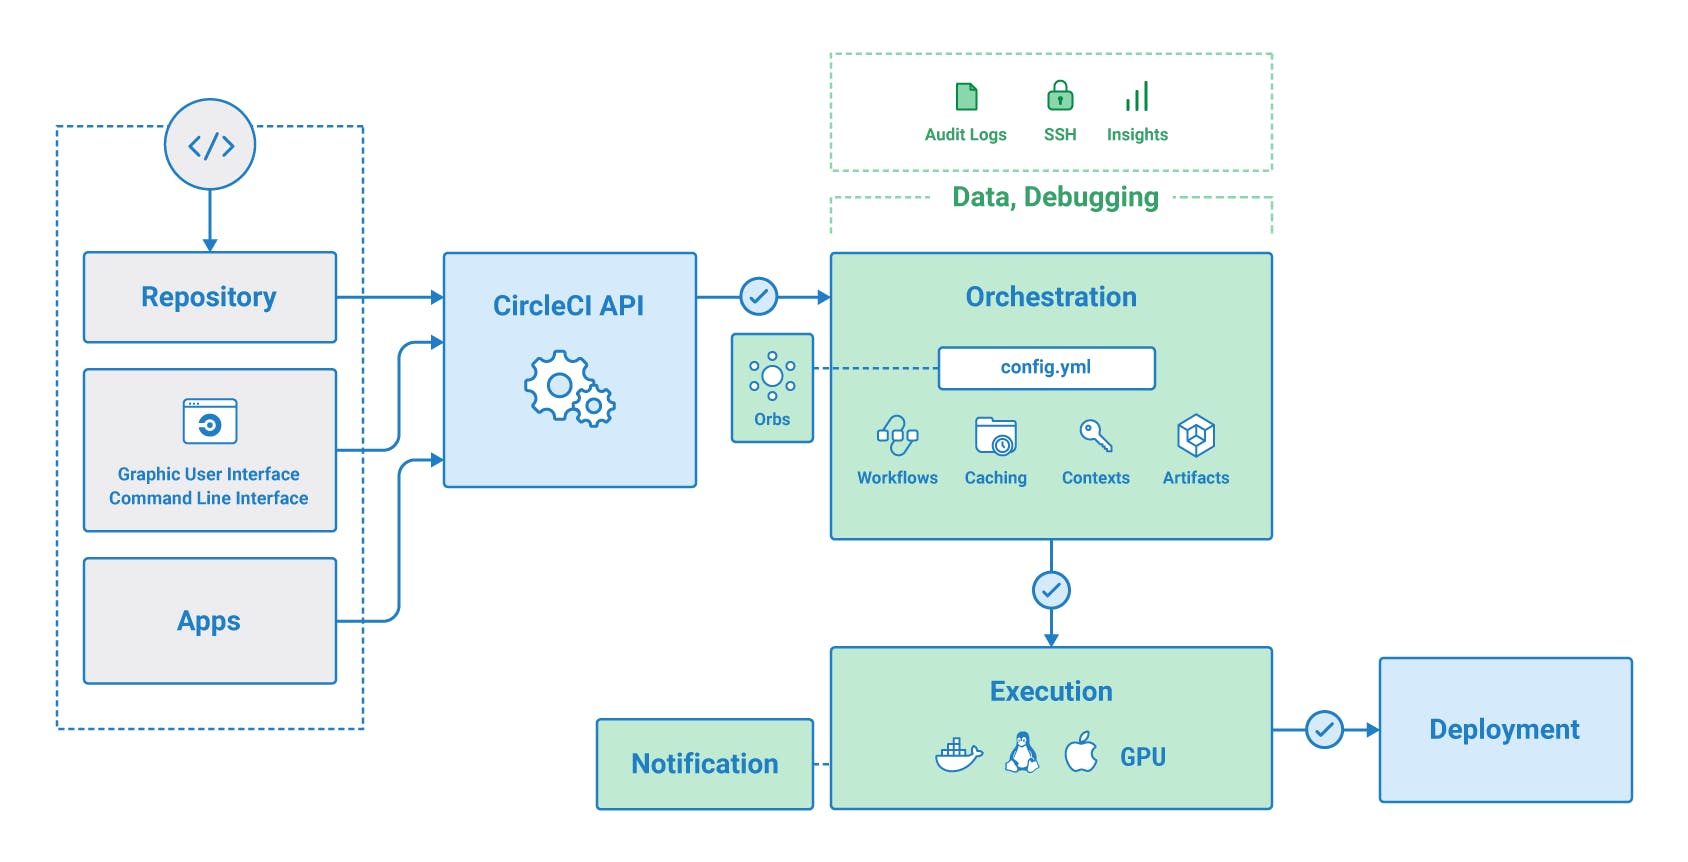
CircleCI: CircleCI stands out for its speed and flexibility. It's a cloud-based system that can be easily scaled to match your project's needs. On the downside, it may require more configuration than other tools, and the cost can escalate for larger projects.
GitLab CI/CD: With GitLab CI/CD, you get a comprehensive solution that's built into the GitLab environment. It's convenient and powerful, with many built-in features. However, it can be overkill if you don't use the other parts of GitLab's suite.
GitHub Actions: This is a robust feature in the GitHub platform, known for its ability to automate software workflows effortlessly. It stands out due to its deep Integration within the GitHub environment and ability to customize workflows within your repositories. Nonetheless, a minor learning curve might be involved for those new to the platform. A standout advantage is its cost-effectiveness - especially for public repositories, which can use GitHub Actions at no cost.

Stay tuned! Our Selection - GitHub Actions: For this guide, we have opted for GitHub Actions. This tool simplifies the automation of all software workflows, inclusive of CI/CD, directly within the GitHub platform. It offers the feature of executing a sequence of commands in reaction to events occurring within your repositories.
It was chosen because it's integrated directly into GitHub, making it very convenient if you're already using GitHub for version control. Moreover, it supports multiple languages and platforms, includes a wide range of pre-built actions, and allows for straightforward configuration via YAML files.
In the following sections, we'll delve deeper into how to leverage GitHub Actions for automating your JavaScript project's code review process.
Setting up Continuous Integration: Step-by-Step
Continuous Integration, often abbreviated as CI, is a development methodology where developers regularly merge their code modifications into a shared repository several times a day. The primary goal of this method is to reduce the potential problems associated with merging significant code alterations at the end of a development cycle, which can result in a multitude of conflicts and bugs.
Step 1: Understand Your Project's Requirements
Before you can set up a CI process, you need to understand the specifics of your project, such as the programming language used, the testing framework in place, the build system, and more. For our JavaScript project, we are using Node.js, Jest as our testing framework, npm as our package manager, and React for the user interface.
To provide some context, let's take a look at an existing project of mine.
This project, 'NoteAPP,' is a web application built using React, a popular JavaScript library for building user interfaces. As part of our tech stack, we use Node.js for our runtime environment, Jest for unit testing, and npm to manage our project dependencies. Let's take a deeper look.
Project Structure:
In the screenshot provided below, the project organization within the IDE is displayed. The key areas of interest have been circled and annotated as follows:
The React components of the application are highlighted with a circle and labeled with the Roman numeral 'I.' These files represent the various components that make up the user interface of our application.
The Jest tests are similarly outlined and are marked with the Roman numeral 'II.' We use these test files to ensure our application is working as expected. Each of these tests corresponds to a specific functionality in our application.
The package.json file is marked with the Roman numeral 'III.' This file is critical for managing project dependencies and scripts. It lists Node.js and npm as dependencies, indicating the technologies our project relies upon.
Refer to the screenshot for a visual guide to the project structure.
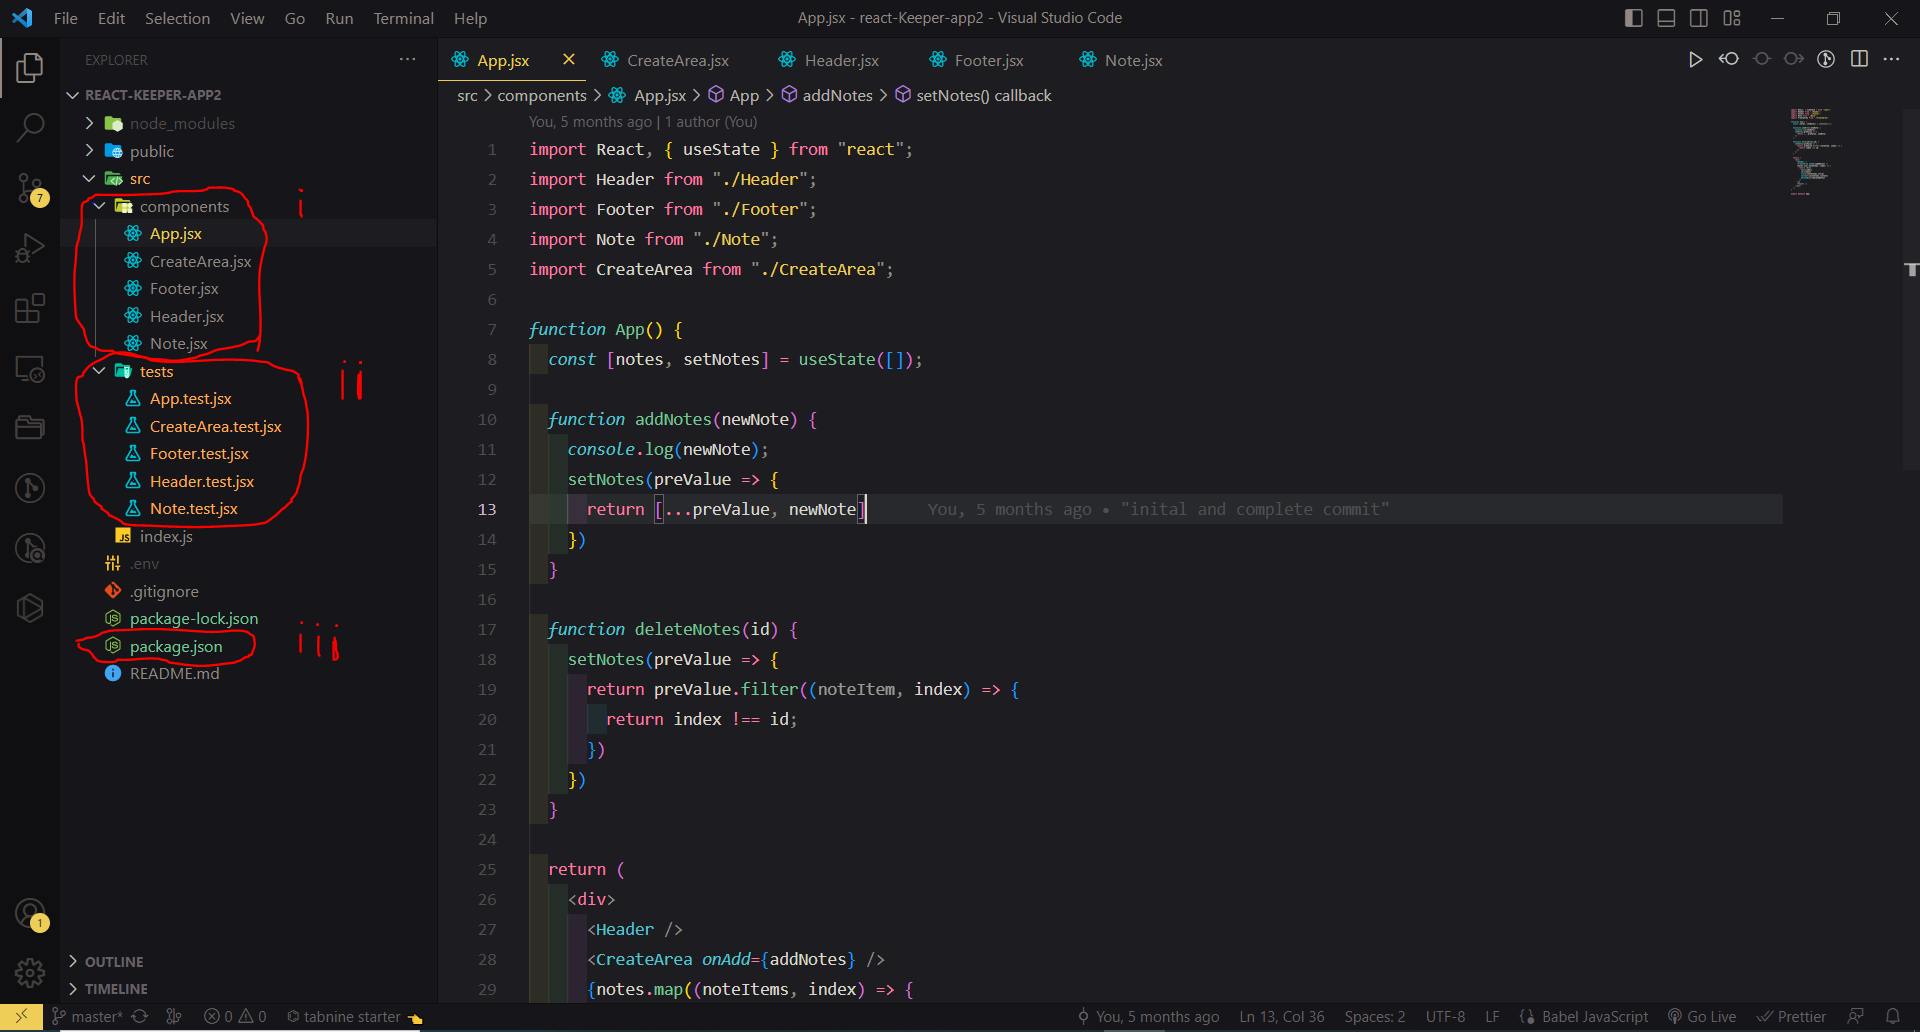
By familiarizing ourselves with this structure, we can better understand how our application is pieced together and where essential elements are located. This understanding is fundamental to setting up an effective CI process.
Code Snippets:
One crucial aspect of our application's development is the testing process. This process helps us verify that all application features are functioning as expected. For this project, we have opted to use Jest, a popular testing framework for JavaScript.
The screenshot below shows a snippet of our basic test implementation in the 'App.test.js' file. This test is rudimentary and is an initial step in our testing process.
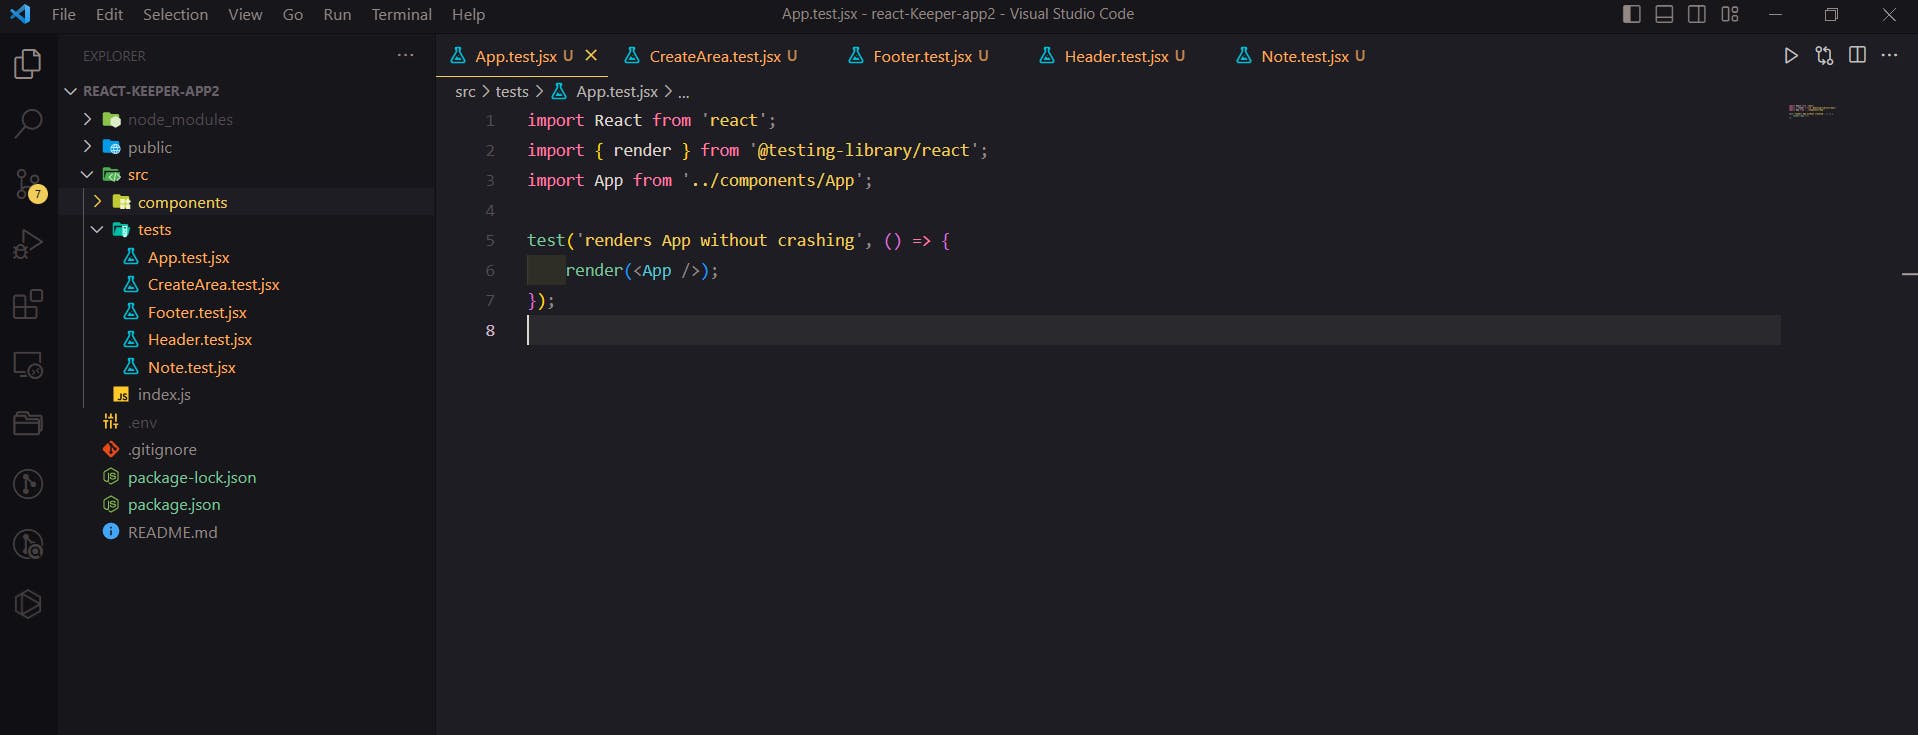
Remember, comprehensive testing often requires creating multiple test cases that check for various possible scenarios, and this simple test is just the starting point. As you progress with your project, you should aim to expand your test suite to cover more aspects of your application's functionality.
The goal here is to give you a taste of how Jest tests are structured and implemented. This basic example allows you to extend and create more complex tests suitable for your project needs.
Understanding these specifics about your project is crucial when setting up a CI/CD process. It influences the workflows you'll create, the test commands you use, and the build scripts necessary for deployment.
Step 2: Choose Your CI/CD Tool
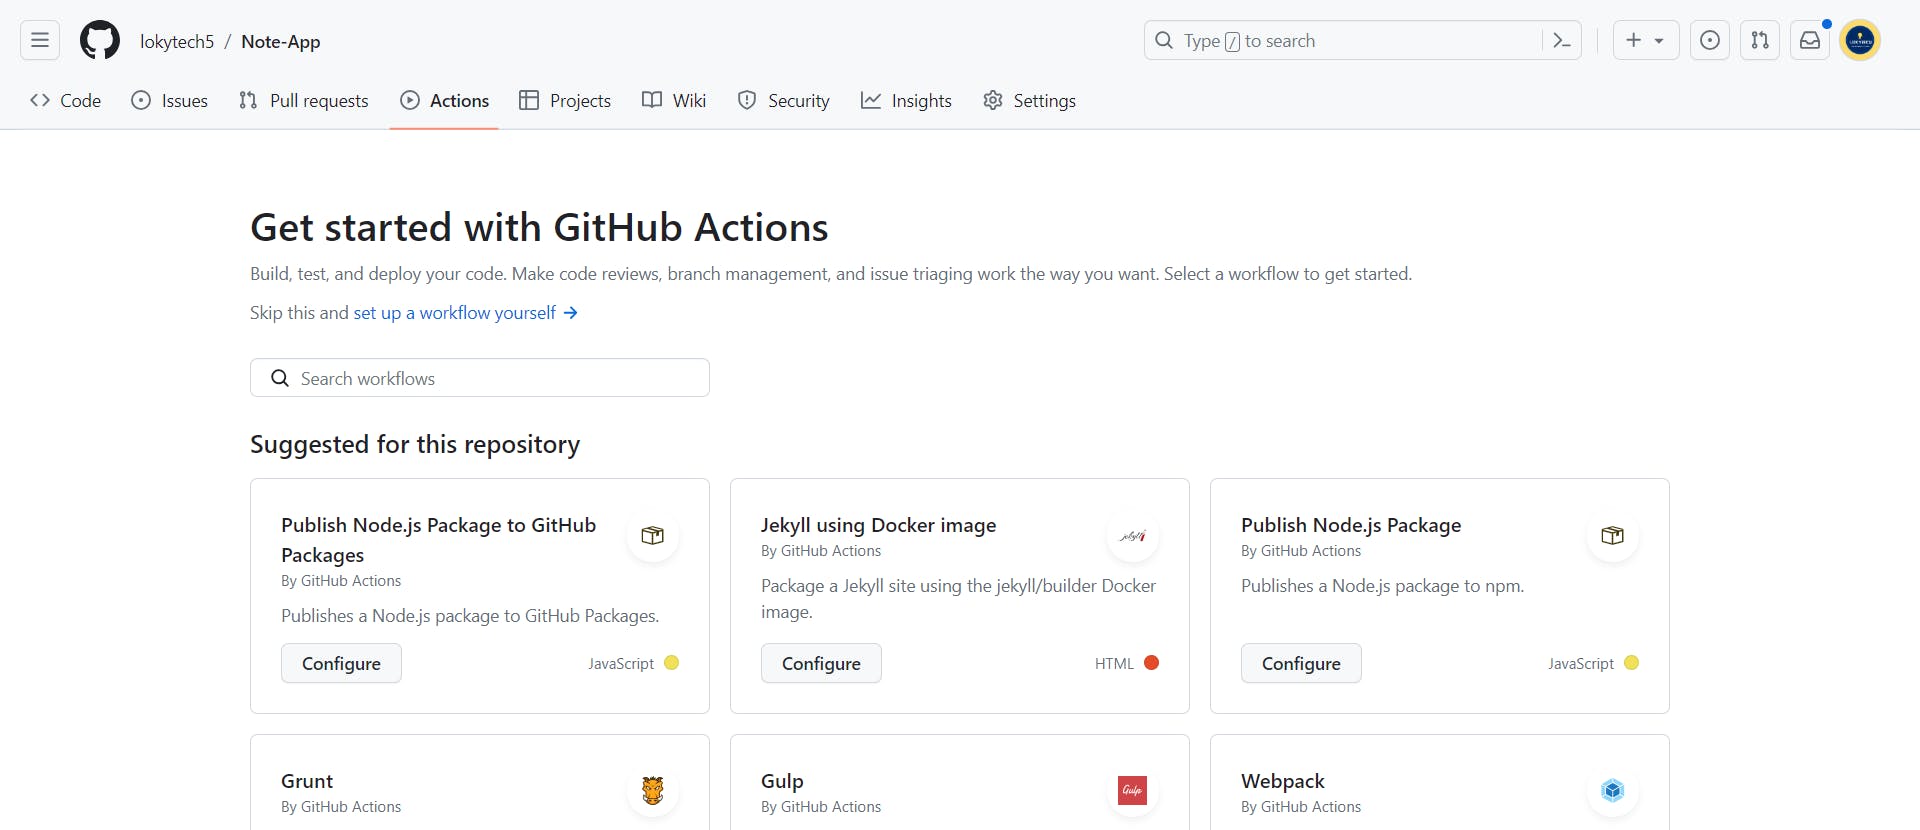
As discussed in the previous section, our tool for this guide is GitHub Actions. However, your choice may vary based on your specific project needs.
Step 3: Configure Your CI Pipeline
The configuration of your CI pipeline will depend on the chosen CI/CD tool. In the case of GitHub Actions, you must create a workflow file in your project repository. The workflow file defines the actions automatically executed whenever the specified event occurs. Click the Set up a workflow yourself on the GitHub Actions page and paste the example code below.
Here's a basic example of a workflow file for a Node.js project:
name: Node.js CI

on: [push]

jobs:
  build:
    runs-on: ubuntu-latest

    strategy:
      matrix:
        node-version: [14.x]

    steps:
    - uses: actions/checkout@v2
    - name: Use Node.js ${{ matrix.node-version }}
      uses: actions/setup-node@v2
      with:
       node-version: '18.14.1'
    - run: npm ci
    - run: npm run build --if-present
    - run: npm test
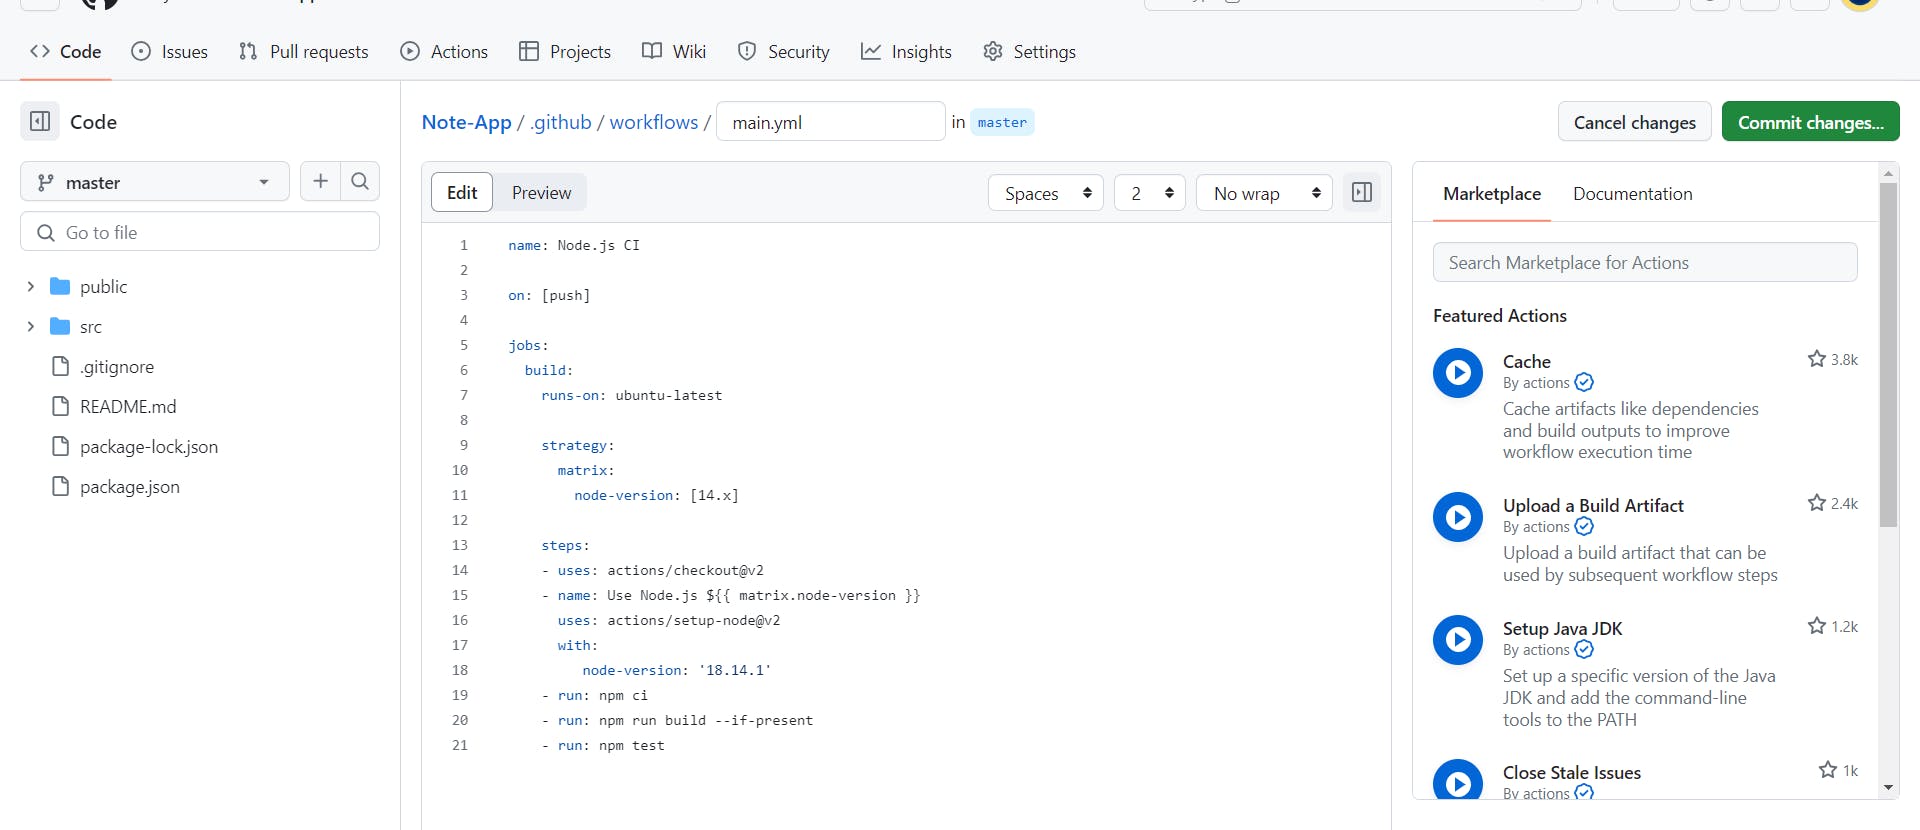
This workflow installs the required Node.js version, installs dependencies, builds the project, and runs tests whenever changes are pushed to the repository. Click commit changes; then you are prompted to Commit directly to the master branch or Initiate a pull request by generating a new branch for this commit; select commit directly to the master branch reason is a faster option as it doesn't require going through the pull request process.
Step 4: Monitor and Adjust Your CI Process
Once your CI process is set up, monitoring its performance and making any necessary adjustments is essential. For instance, if your tests take too long, you might need to optimize them or adjust your workflow to run them in parallel.
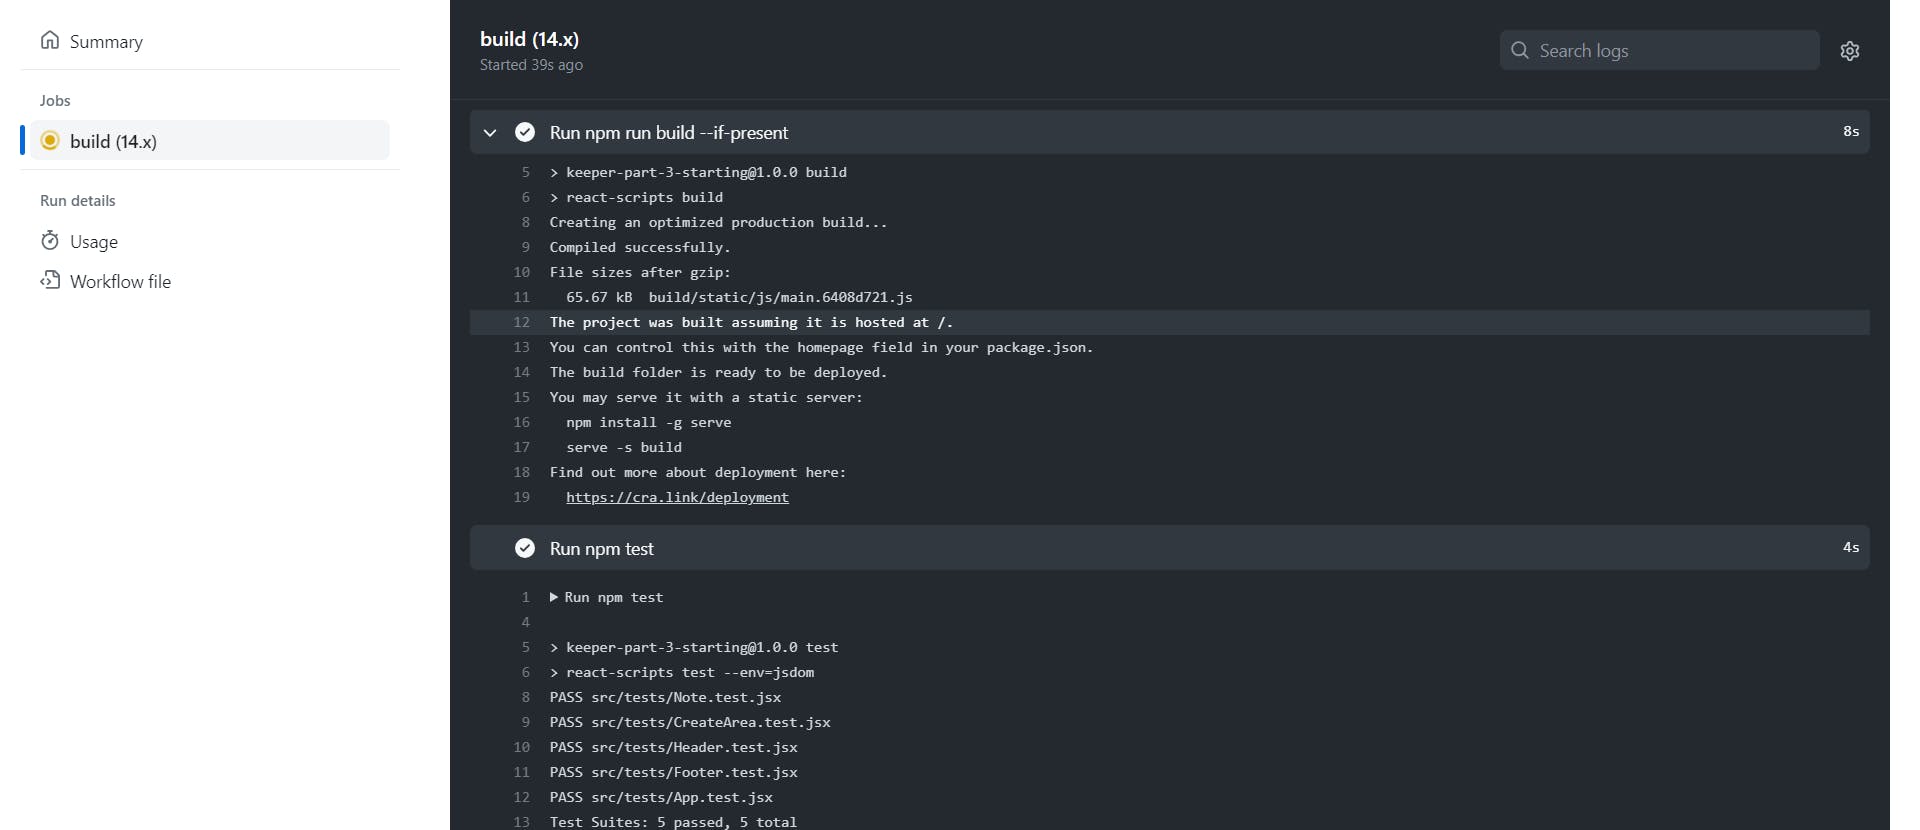
This is how our JavaScript project's CI process is set up. With this in place, every code commit triggers an automatic build and test, ensuring all changes integrate smoothly into the existing codebase.
This process saves the team time and effort, quickly flags potential issues, and helps maintain a high-quality codebase ready for deployment at any time.
Real-time Example: CI in Action
Let's see how this CI process works in a real-world scenario. In our JavaScript project, whenever a team member makes changes to the codebase, they push these changes to the shared GitHub repository. This triggers the CI process we've set up with GitHub Actions. As you can see below, the status is in progress because a commit was made to the repository.
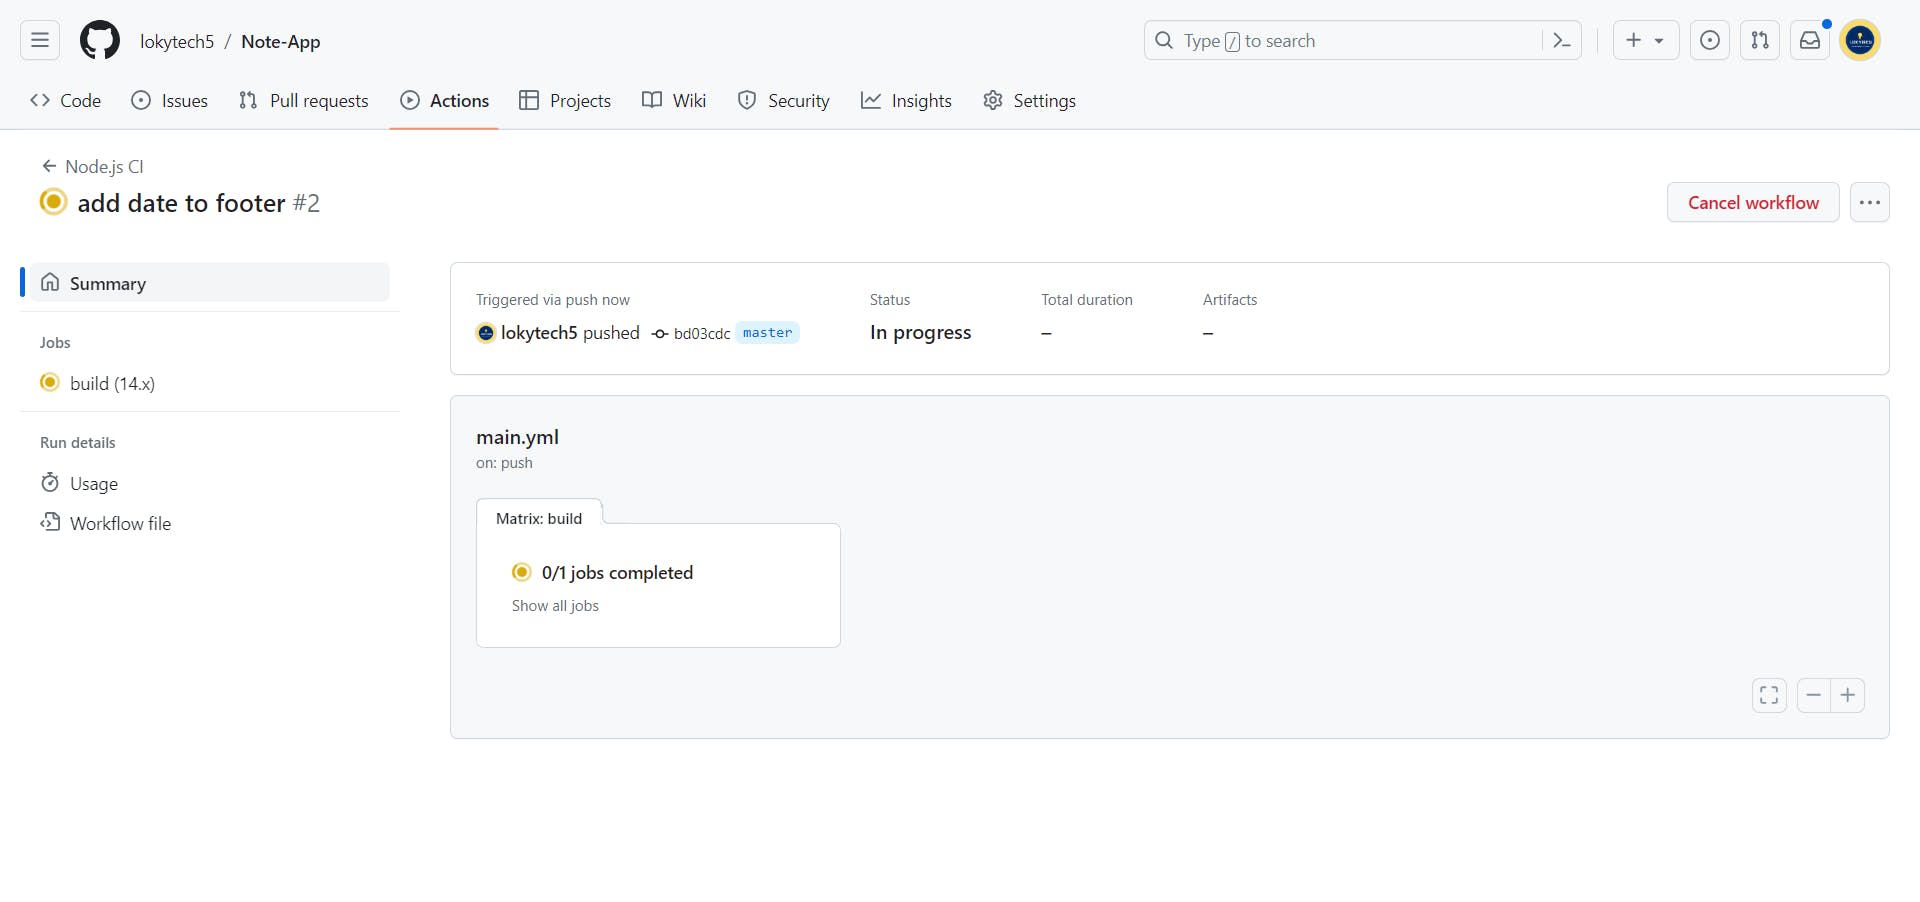
The CI process then automatically builds our project, runs our tests, and reports back within a few minutes. If the tests pass, the developer gets a green light that their changes have not broken the existing code. If tests fail, they immediately receive feedback on what went wrong, allowing quick fixes.
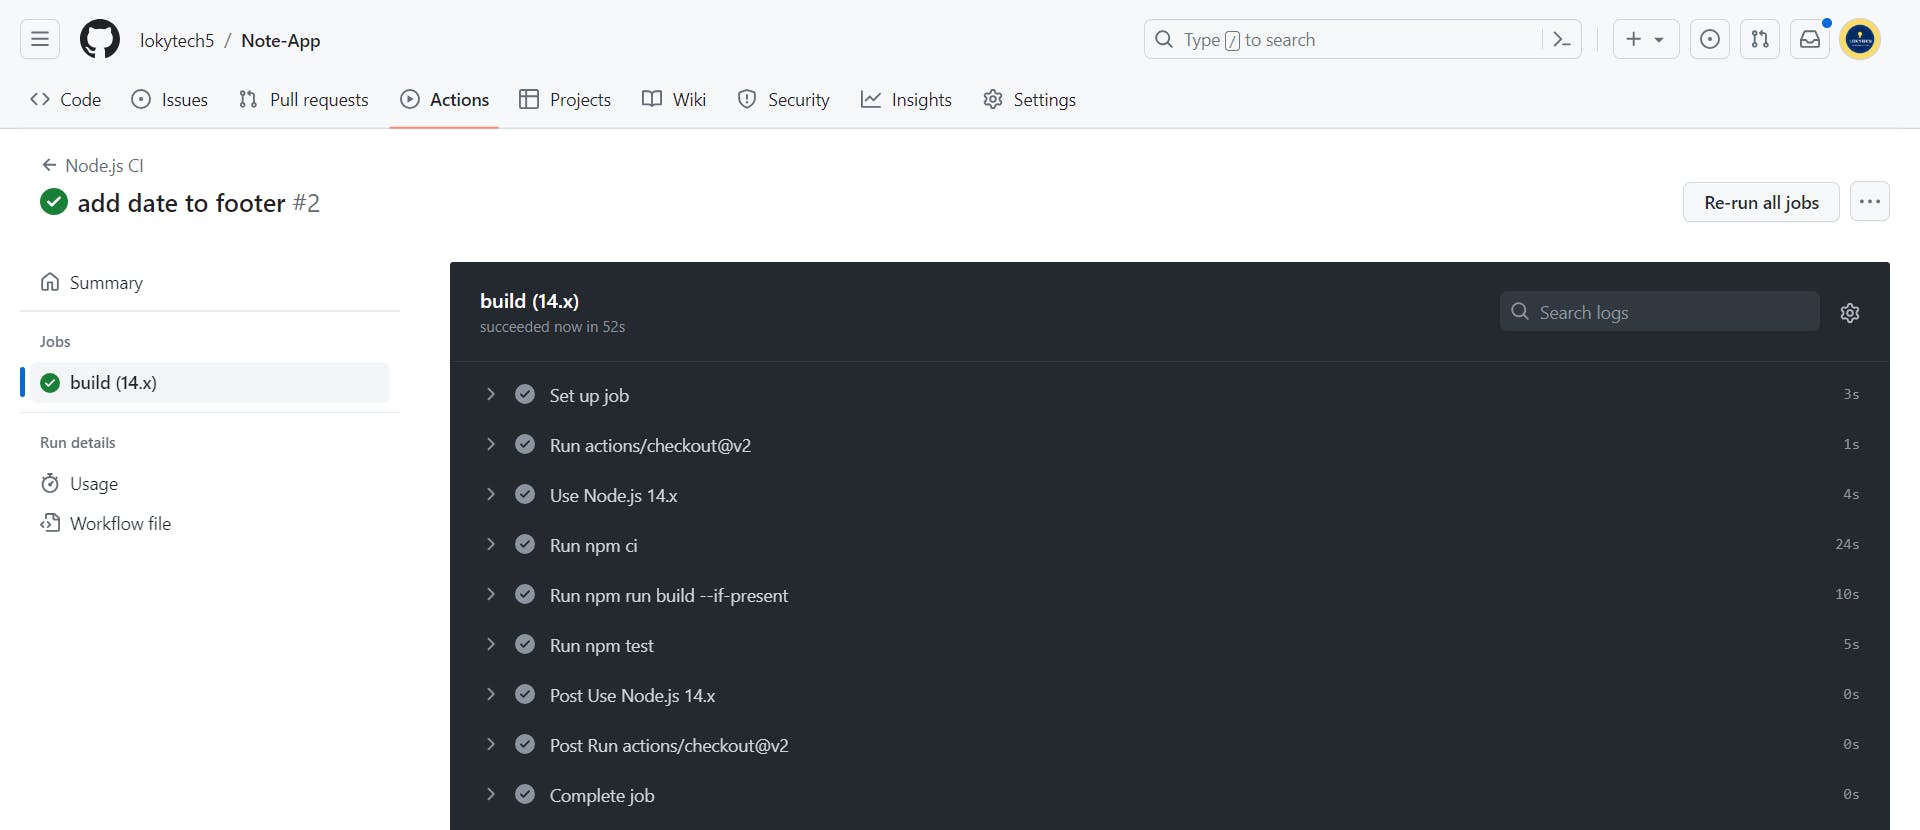
This efficient and automated process significantly reduces the manual effort involved in integrating code changes and testing them, allowing our team to focus on developing new features and improving the product.
By following these steps, you, too, can set up a Continuous Integration process for your projects. In the next section, we'll dive into setting up Continuous Delivery. Stay tuned!
Setting up Continuous Deployment: Step-by-Step
Continuous Deployment (CD) is a development practice that automatically deploys all code changes to a production environment after passing automated tests. It's the next step after Continuous Integration, enabling constant changes in production.
Step 1: Understand Your Project's Deployment Needs
Before setting up CD, evaluate your project's specific deployment requirements. For instance, our JavaScript project requires a Node.js environment to run, so we must ensure our production environment supports this by adding "deploy" : "npm run buid" to your scripts inside your package.json file
Step 2: Choose Your CD Tool
For this guide, we're extending our use of GitHub Actions to manage our CD process. By using the same tool for CI and CD, we can ensure a smoother transition from Integration to deployment.
Step 3: Configure Your CD Pipeline
Setting up CD with GitHub Actions requires creating or updating an existing workflow file in your project repository. This file defines the actions to be executed automatically whenever specified events occur.
Here's an example of a workflow file that includes the CD process for our Node.js project:
yamlCopy codename: Node.js CI/CD

on: [push]

jobs:
  build:
    runs-on: ubuntu-latest

    strategy:
      matrix:
        node-version: [14.x]

    steps:
    - uses: actions/checkout@v2
    - name: Use Node.js ${{ matrix.node-version }}
      uses: actions/setup-node@v2
      with:
        node-version: '18.14.1'
    - run: npm ci
    - run: npm run build --if-present
    - run: npm test
    - name: Deploy to Production
      run: npm run deploy
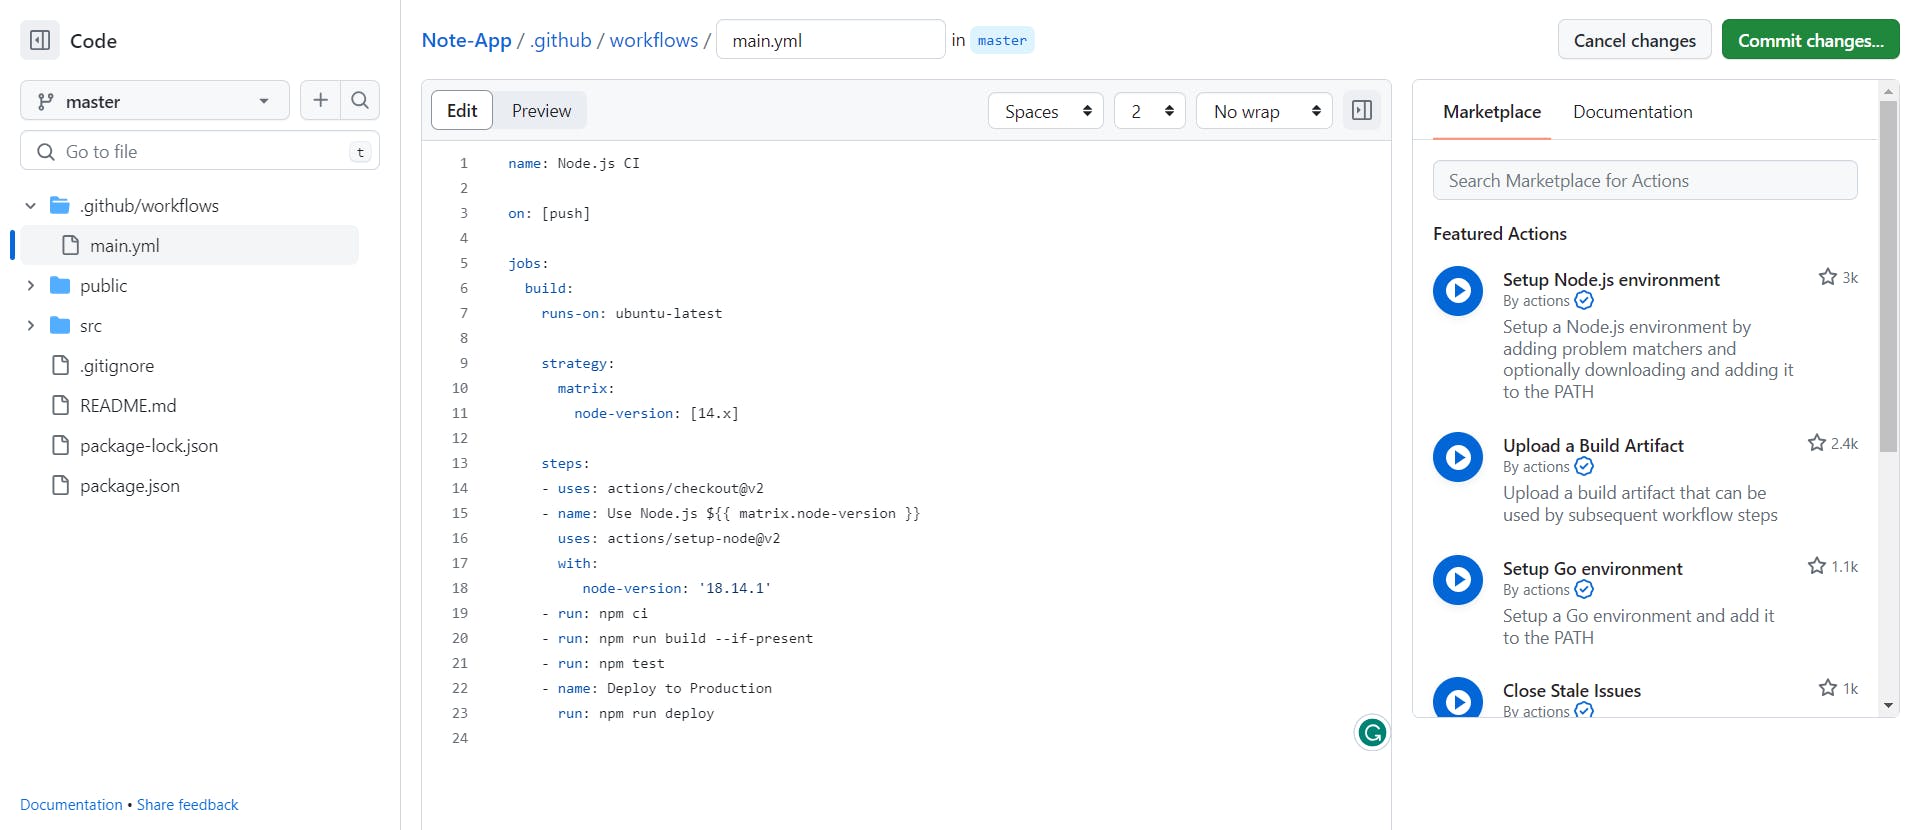
This workflow installs the required Node.js version, installs dependencies, builds the project, runs tests, and if all tests pass, it deploys the application to the production environment.
Step 4: Monitor Your CD Process
Once your CD process is set up, monitor its performance and adjust as needed. For instance, if you notice failed deployments, you may need to revisit your tests or check the configuration of your production environment.
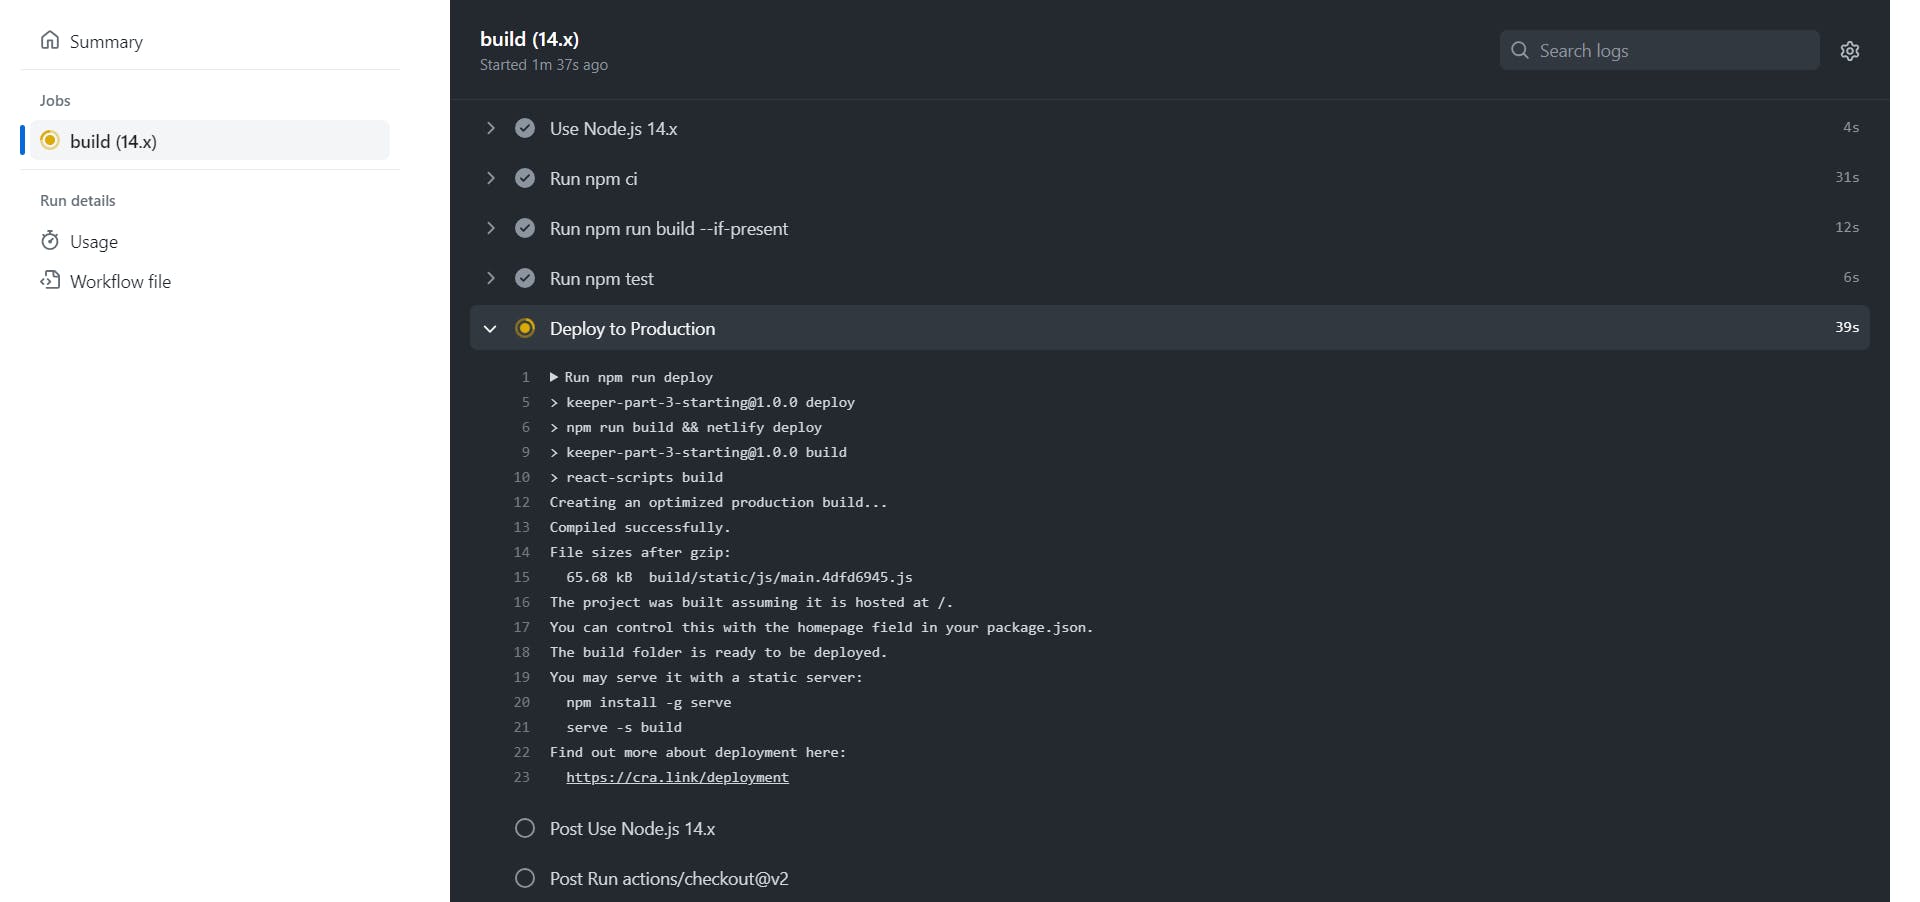
With this setup, our JavaScript project is automatically tested and deployed whenever changes are pushed to the repository. This practice accelerates the release process and ensures a high level of code quality, as every change is thoroughly tested before being deployed.
Real-time Example: CD in Action
Let's look at our CD process in action with our JavaScript project. When a team member pushes changes to the codebase, GitHub Actions triggers our CD process.
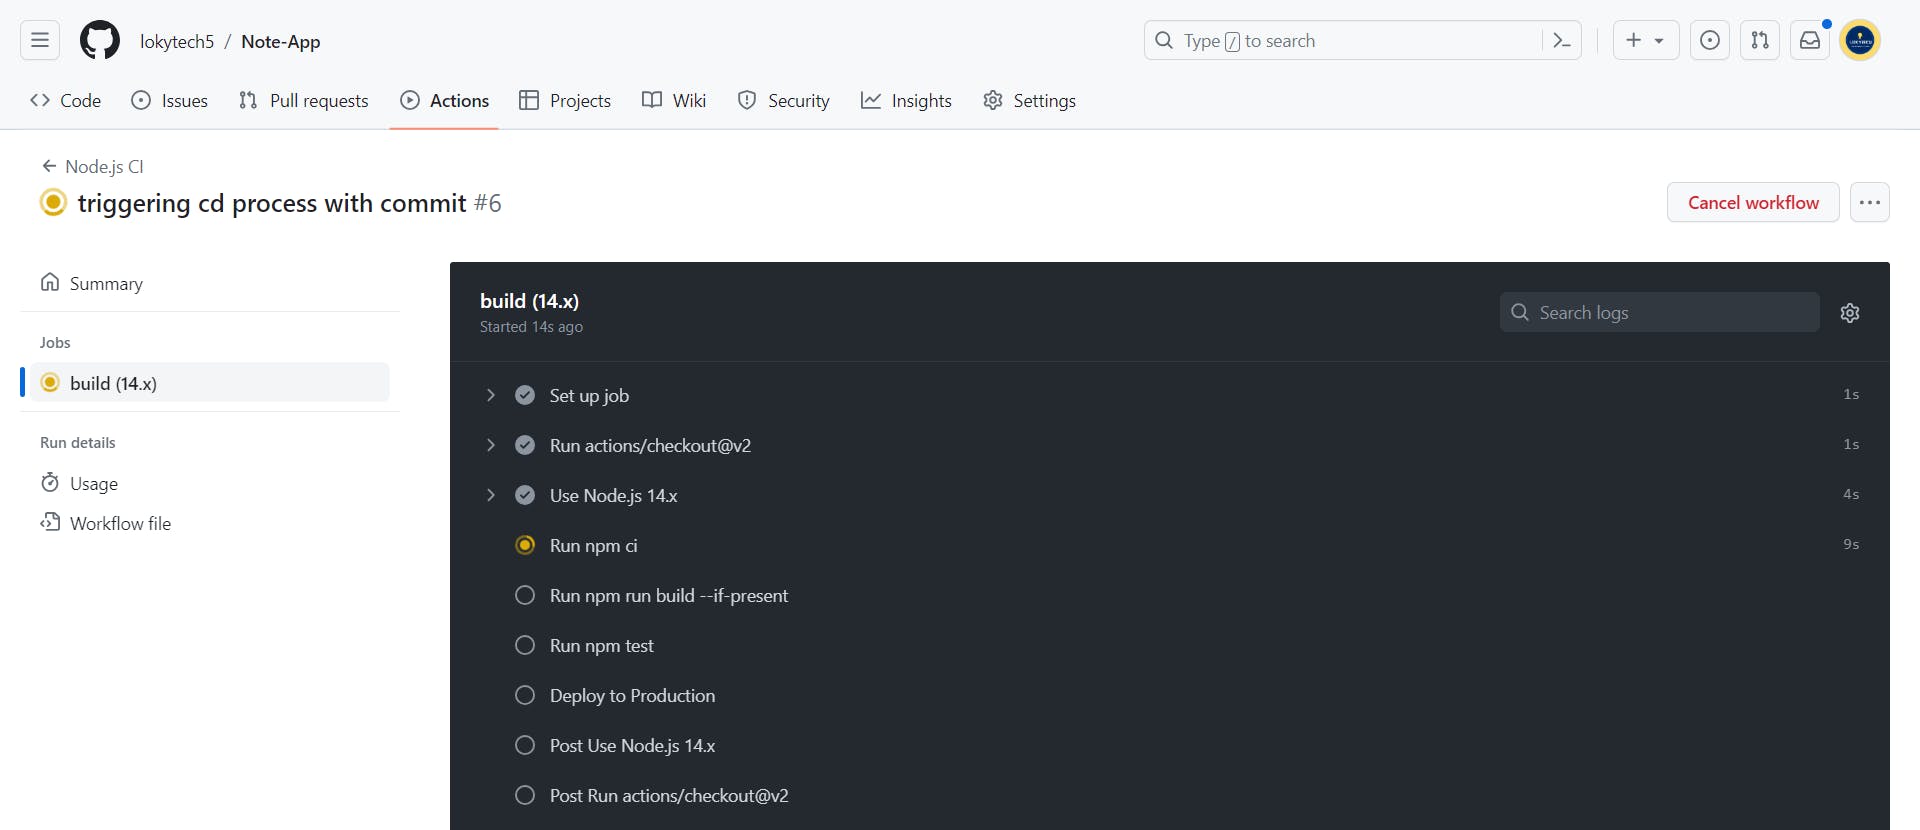
The CD process automatically builds the project, runs the tests, and if all tests pass, it deploys the changes to the production environment. This automated process ensures that our application is always deployable and that any new features or fixes are promptly available to our users.
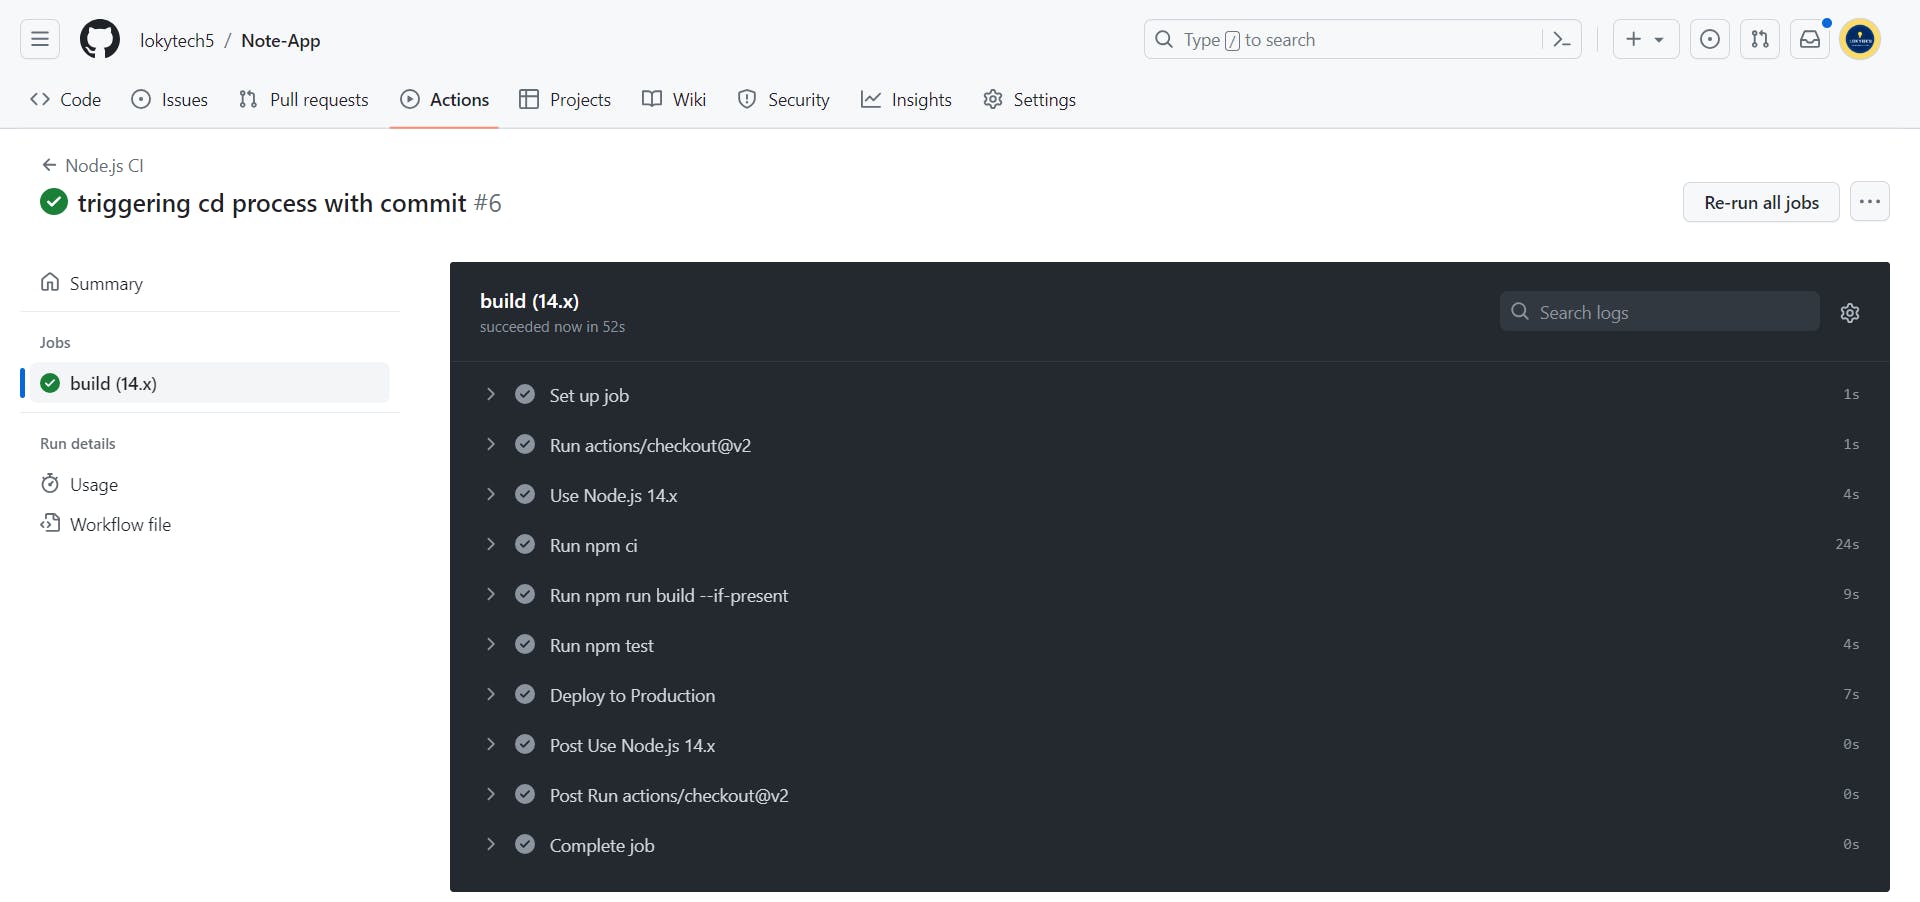
By following these steps, you can automate the deployment process of your projects, ensuring rapid and reliable releases. In the next section, we'll wrap up our guide with a summary of the benefits of CI/CD. Stay tuned!
Monitoring and Troubleshooting your CI/CD Pipeline
Monitoring and troubleshooting are critical to managing a successful CI/CD pipeline. Regularly reviewing the performance and identifying potential issues can ensure seamless Integration and deployment. This section provides practical advice on overseeing your CI/CD pipeline and addressing everyday challenges.
Monitoring Your CI/CD Pipeline
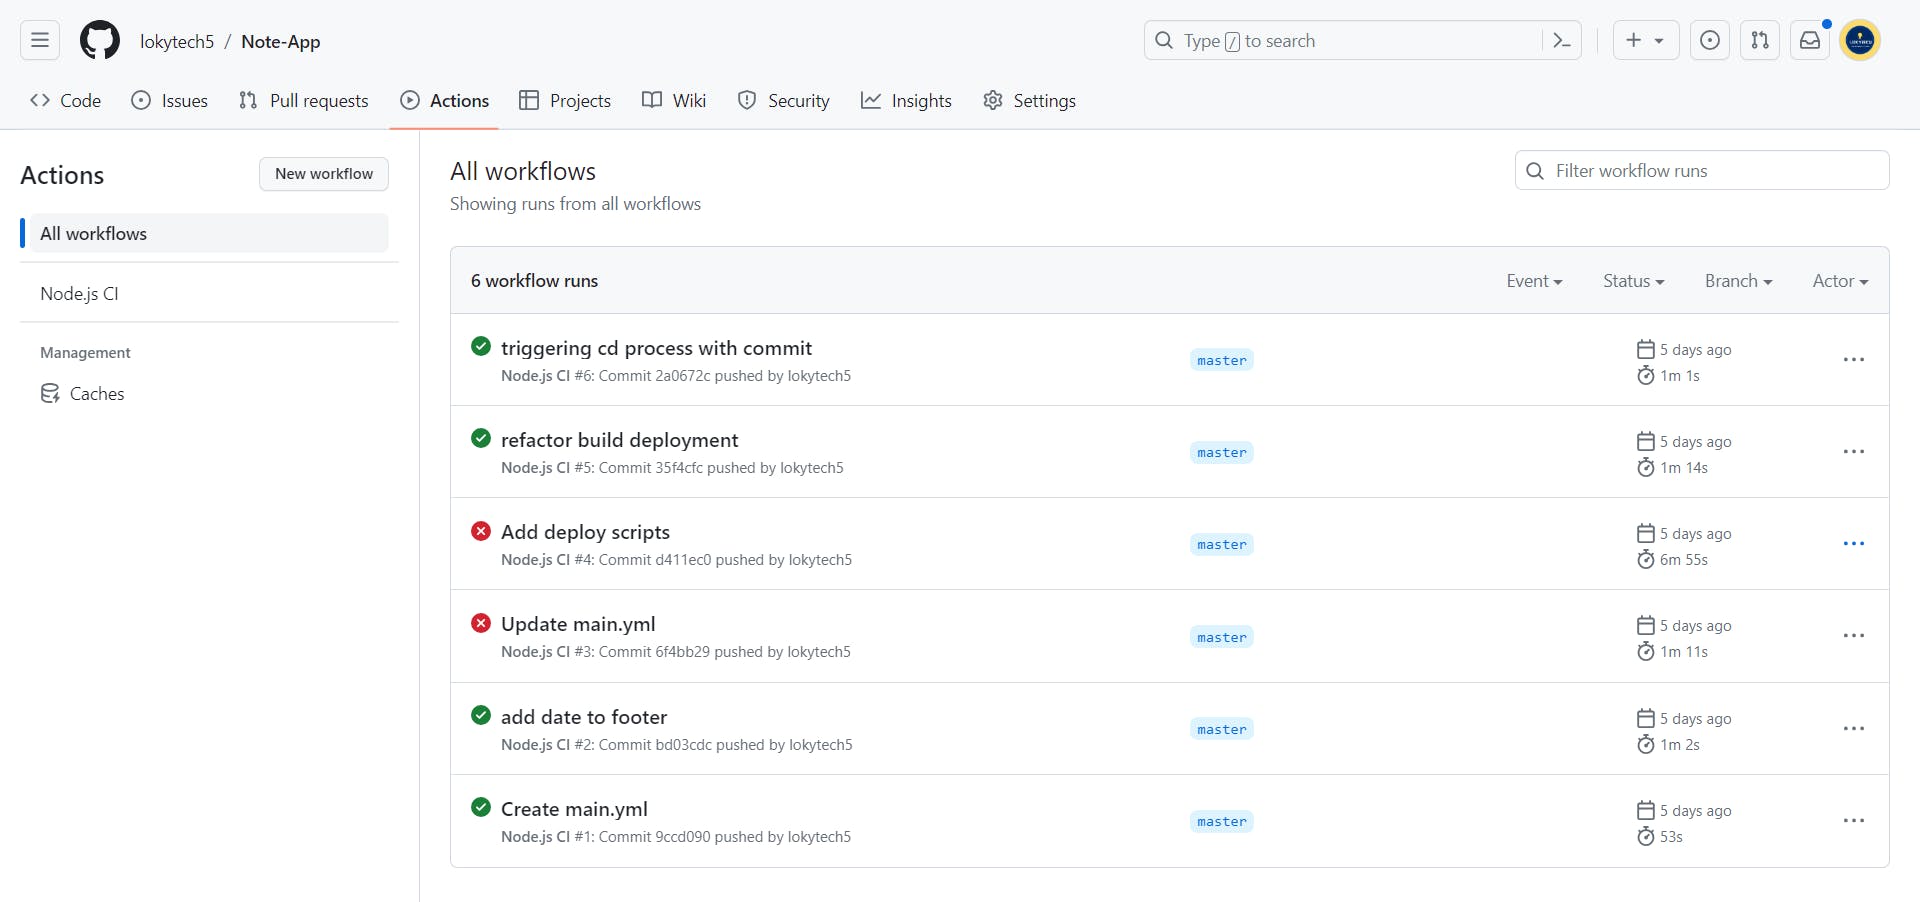
Monitoring is closely monitoring your CI/CD pipeline to ensure everything is running as expected. It can help you identify bottlenecks or inefficiencies in your workflows and respond to issues before they escalate.
Dashboard and notifications: Most CI/CD tools, including GitHub Actions, provide a dashboard that allows you to see the status of your workflows at a glance. You can also set up notifications for failed runs or errors.
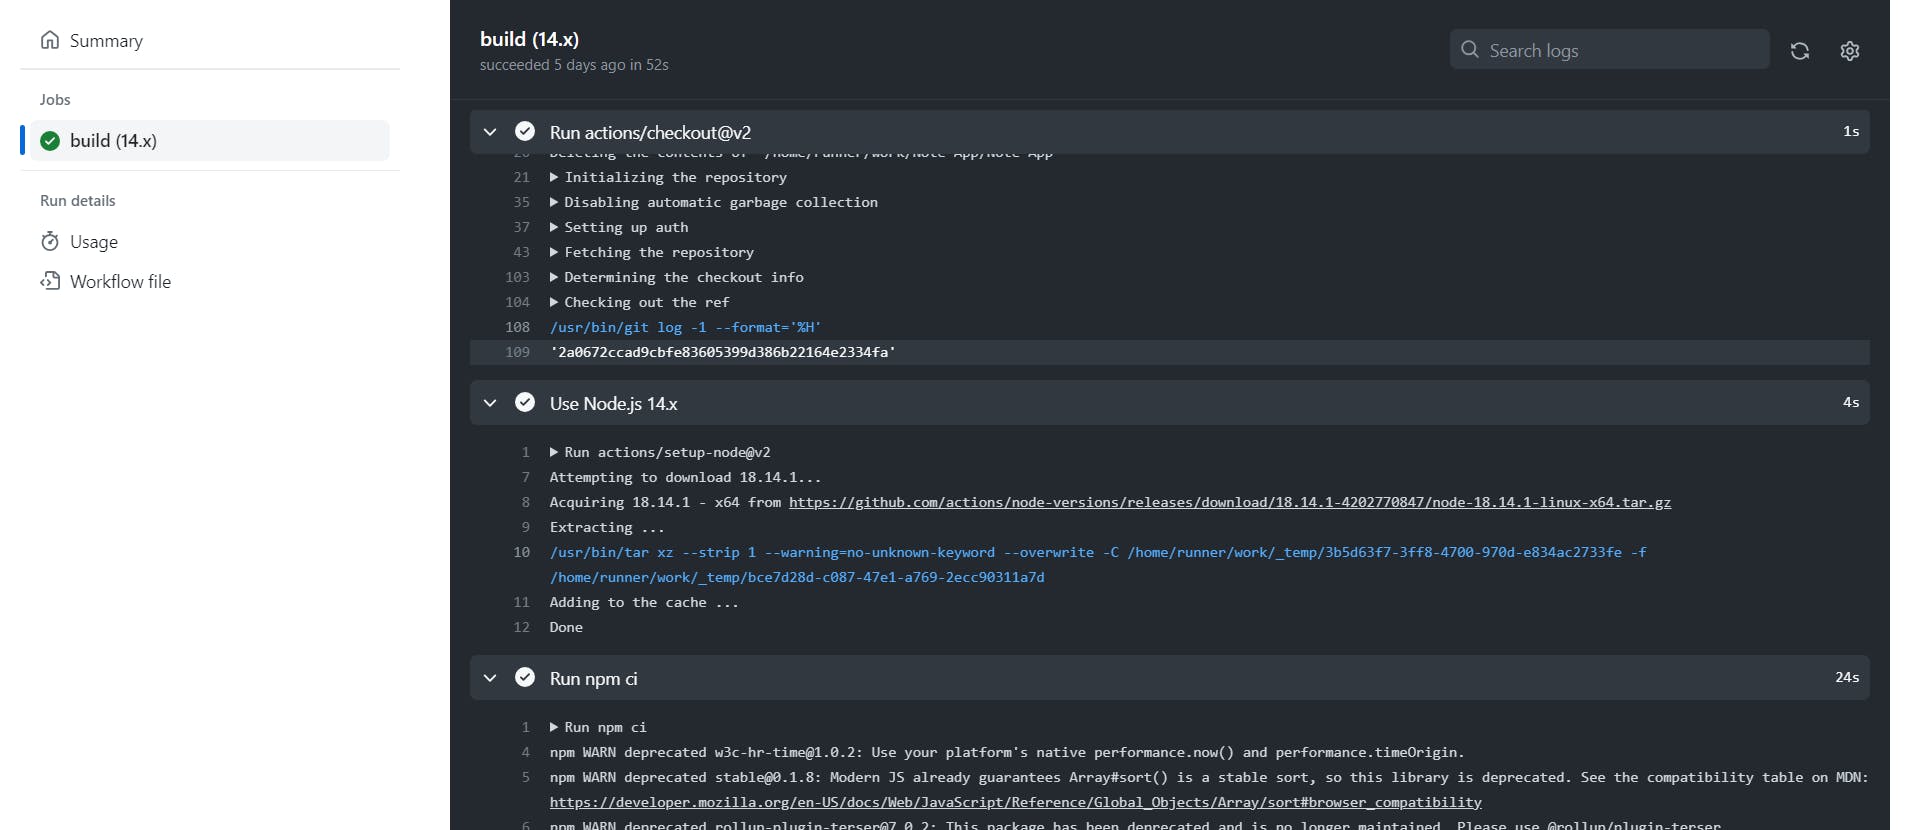
Logs: Detailed logs are valuable for identifying what went wrong during a CI/CD process. You can use these logs to troubleshoot and refine your workflows.
Common Hiccups and Fixes
In my experience, here are some common issues you might encounter and some insights on how to address them:
Failed Tests: If your tests fail, check the logs to identify the problem. Sometimes, it might be due to a simple coding error. Other times, it may be a symptom of a more severe issue, such as code that doesn't behave as expected under certain conditions. In such cases, your priority should be to fix the code and ensure that it passes all tests.
Inconsistent Environments: Differences between the testing and production environments can lead to unexpected behaviors. It's best to keep the settings as similar as possible to avoid this. Using containers like Docker can help maintain consistency across different environments.
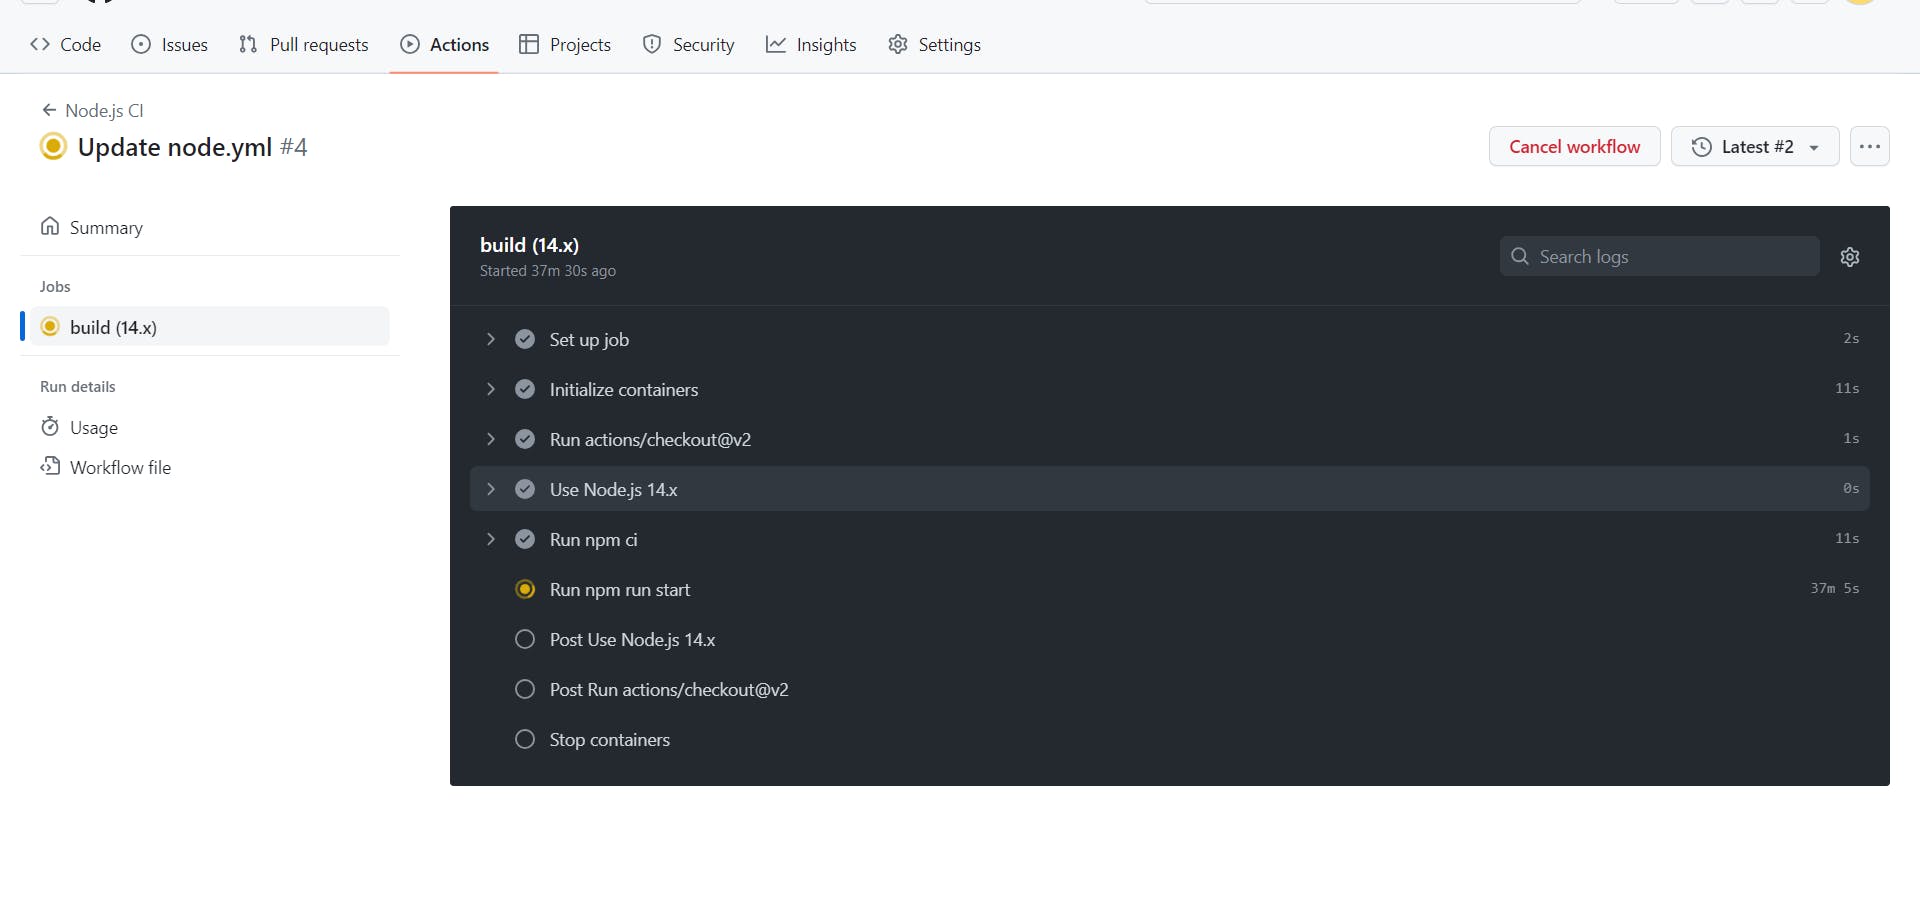
Long Running Pipelines: If your pipeline takes too long, it might discourage frequent commits. This can be addressed by optimizing your tests or splitting your workflow into parallel jobs to reduce the overall runtime. The screenshot below shows a long-running test taking 37min and more.
Flaky Tests: These intermittently pass and fail without any code changes. They can be tricky to troubleshoot, but identifying and fixing them is crucial for maintaining trust in your testing process.
Remember, the goal of CI/CD is to streamline the development process. If any part of your pipeline causes more problems than it solves, it might be time to rethink.
In the next section, we'll summarize and give some final thoughts on how implementing CI/CD can enhance your development process. Stay tuned!
Best Practices for a Robust CI/CD Pipeline
In setting up and managing a CI/CD pipeline, you should follow certain best practices to ensure its effectiveness and reliability. In this section, I will share some essential dos and Don'ts based on my experience, which can serve as recommendations for a robust CI/CD pipeline.
Do's
Commit Frequently: Continuous Integration is all about integrating small changes frequently. Try to make it a practice to commit your code changes daily, if not more regularly. Frequent commits reduce the complexity of merges and make locating and fixing bugs easier.
Prioritize Test Automation: Automated testing is the backbone of any successful CI/CD pipeline. The more you can automate your tests, the faster and more reliable your Integration and delivery will be.
Maintain Code Quality: Use linting tools and code quality measures to maintain a high-quality codebase. It's easier to prevent bugs than to fix them.
Monitor Your Pipelines: Be proactive about monitoring your CI/CD pipeline. This includes setting up notifications for failed deployments and regularly reviewing your pipelines for potential bottlenecks or inefficiencies.
Don'ts
Ignore Failed Tests: Never overlook failed tests. A red flag in your CI/CD pipeline should be dealt with promptly to prevent minor issues from escalating into major problems.
Forget about Security: Security should be a key consideration throughout the CI/CD process. This includes ensuring secure coding practices, conducting regular security audits, and promptly updating dependencies to patched versions.
Overcomplicate Your Pipeline: While automating your CI/CD process is essential, keep your pipeline as simple as possible. Overcomplicated channels can become challenging to manage and maintain.
Silence Notifications: While an influx of notifications can sometimes be overwhelming, they serve as your early warning system. Adjust your settings to a level that keeps you informed without causing unnecessary distractions.
By adhering to these best practices, you can maximize the benefits of your CI/CD pipeline, leading to a more efficient, productive, and enjoyable development process.
In the next section, we'll look at additional resources to deepen your understanding and ability to work with CI/CD pipelines. Stay tuned!
Wrap Up
As we come to the end of this guide, let's take a moment to reflect on the journey we've embarked on together. We've explored the concepts of Continuous Integration and Continuous Delivery, delved into the details of setting up a CI/CD pipeline using GitHub Actions, discussed best practices, and even navigated potential hiccups in the process.
The benefits of implementing a robust CI/CD pipeline are manifold. Not only does it automate the mundane and error-prone aspects of software development, but it also fosters a culture of collaboration and responsibility among team members. Code quality is greatly enhanced with regular commits, automated testing, and quick feedback. Moreover, it ensures that your software is always in a release-ready state, thus enabling quicker and more reliable software delivery.
As you continue your journey in mastering CI/CD, remember that it is a continuous learning process. The world of software development is constantly evolving, and so should your practices. Keep exploring, learning, and innovating. Here are a few next steps you can take:
Deepen your understanding: Plenty of resources are available to learn more about CI/CD. Online documentation, tutorials, and communities can provide further insights and expertise.
Experiment with other tools: While we've focused on GitHub Actions in this guide, there are other CI/CD tools. Feel free to explore and experiment with them.
Apply CI/CD to other projects: Try applying CI/CD practices to other tasks or start a new project with CI/CD from the beginning. The more you practice, the better you will get.
Lastly, I hope this guide has empowered you to set up and manage your CI/CD pipelines confidently. Remember, creating a more efficient, productive, and enjoyable software development process is the goal. Happy coding!
Further Resources
Continuous Integration and Continuous Delivery stand as some of the most significant vital skills to hone in the vast expanse of software development. To aid you on your journey to mastery, I've curated a list of excellent resources that have helped me and others delve deeper into CI/CD. These resources can offer further insights, practical tips, and community support.
Books
- "Continuous Delivery: Reliable Software Releases through Build, Test, and Deployment Automation" by Jez Humble and David Farley: This book is often hailed as the bible of CI/CD. It's a comprehensive read that lays a solid foundation on the principles and practices of Continuous Delivery.
Online Courses
"DevOps Foundations Continuous Delivery/Continuous Integration" on LinkedIn Learning: This course provides an excellent overview of the DevOps culture, including CI/CD. It's suitable for beginners and those looking to refresh their knowledge.
"Continuous Integration and Deployment with AWS Developer Tools" on Coursera: This course provides practical insights into setting up CI/CD pipelines using Amazon Web Services developer tools.
YouTube Channels
- DevOps Directive: This channel provides practical guides and tutorials on DevOps topics, including CI/CD.
Communities
DevOps Subreddit: A very active community where you can discuss, ask questions, and share resources about DevOps, including CI/CD.
GitHub Community: This is a helpful place to discuss and resolve any issues you might encounter while using GitHub Actions for your CI/CD pipeline.
By leveraging these resources, you can deepen your understanding of CI/CD, stay updated on the latest practices, and get help when facing challenges. Remember, mastery is a journey of continuous learning. Happy exploring!