Part 2: Implementing Email Registration Logic and SendGrid Integration

👋 Greetings, tech lovers! My expertise lies in Java backend engineering, focusing on refining microservices architecture. Web development, for me, is an endless expedition of discovery 🌌. When I share insights through my writings ✍️, it's a beacon of my passion. Each piece is a guiding lighthouse 🗼, hoping to enlighten your path and inspire your tech journey.
In the first part of our series, we laid the groundwork by establishing Azure Functions and initializing our Node.js project for our automated email registration system. As we advance to Part 2, our focus shifts to the core of the system - the development of the registration logic and the seamless integration with SendGrid, a leading email automation service.
In this part, we will guide you through the intricate process of coding the registration Function within Azure Functions, testing it locally, and integrating it with SendGrid for effective email automation. Specifically, in the upcoming section on "Developing the Registration Logic," we aim to:
Create a dynamic registration Function that responds to user actions, efficiently processes registration data, and ensures secure handling of user information.
Providing detailed instructions for local testing and debugging to ensure the Function performs as expected, addressing issues and how to overcome them.
Equipping you with Knowledge to integrate SendGrid, utilizing its powerful API for sending automated emails as part of the registration process, enhancing the user experience with timely communications.
By following these structured steps, you'll deepen your understanding of serverless application development and email automation, equipping you with the skills to implement a critical component of your application with Azure Functions and SendGrid.
Developing the Registration Logic
In our effort to build a system that efficiently handles email registrations, the next logical step is to develop a registration Function within Azure Functions. This Function is crucial in our system and is responsible for processing incoming registration data from users.
Case Study: Implementing a Workshop Registration System for a Tech Conference
In this case study, we explore the application of our Azure Functions-based registration logic to a practical scenario: a tech conference seeking an efficient system for managing workshop registrations. This example demonstrates how our developed Functions can be tailored to handle more complex registration processes, including user preferences for specific sessions and personalized email confirmations.
Scenario Overview
A leading tech conference offers a variety of workshops and sessions. Participants can choose their preferred sessions at the time of registration. The challenge involves developing a registration system that gathers and verifies participant information and dispatches customized confirmation emails outlining their selected sessions.
Function Design and Workflow
The Azure Function is designed to:
Collect Detailed Registration Information: This entails collecting essential contact information and the participants' specific session preferences, matching the vast array of workshops offered at the conference.
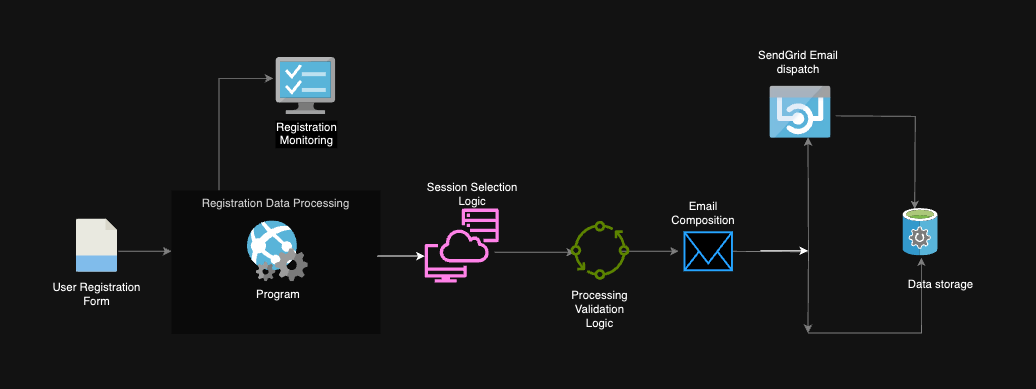
Perform Comprehensive Data Validation: The Function ensures information completeness and validates the availability of selected sessions against the conference schedule, as depicted in the flowchart steps.
Send Personalized Confirmation Emails: Upon successful registration, automated yet customized emails are dispatched, detailed with session choices, providing participants with an organized summary of their agenda.
Real-World Application and Impact
Implementing this Azure Function will significantly improve the registration process for conference organizers, making it more efficient, as demonstrated in the provided flowchart. This has resulted in a smoother experience for attendees. Moreover, automation has dramatically reduced the burden of manual administrative work and enhanced attendee engagement by ensuring timely and relevant communication.
// Sample data structure for testing purposes.
// In production, remove the following mock data and ensure all data comes from the request body (req.body).
const conferenceSchedule = [
    { id: 1, title: "Emerging Technologies in AI", timeSlot: "9:00 AM - 10:30 AM" },
    { id: 2, title: "Learn Blockchain", timeSlot: "11:00 AM - 12:30 PM" },
    { id: 3, title: "The Future of Cloud computing", timeSlot: "2:00 PM - 3:30 PM" },

]

const registrationData = {
    name: "Jane Doe",
    email: "jane.doe@example.com",
    organization: "Tech Innovators Inc.",
    position: "Software Developer",
    sessions: [
        { id: 1, title: "Emerging Technologies in AI", timeSlot: "9:00 AM - 10:30 AM" },
        { id: 2, title: "Learn Blockchain", timeSlot: "11:00 AM - 12:30 PM" },
    ],
};

module.exports = async function (context, req) {
    context.log('Processing workshop registration request.');

    const registrationDetails = req.body || registrationData;

    // Validate registration details
    const validationResult = validateRegistrationDetails(registrationDetails, conferenceSchedule);
    if (!validationResult.isValid) {
        context.res = { status: 400, body: validationResult.message };
        return;
    }

    //confirmation message to send back to the user
    const confirmationMessage = `Hello ${registrationDetails.name}, your registration for the selected sessions has been successfully processed.`;

    context.res = {
        status: 200,
        body: confirmationMessage
    };
};

function validateRegistrationDetails(details, schedule) {
    let isValid = true;
    let message = 'Registration details are valid.';

   // Check if all required fields are present
   if (!details.name || !details.email || !details.sessions || details.sessions.length === 0) {
    isValid = false;
    message = 'Missing required registration details: name, email, or sessions.';
    return { isValid, message };
}

    // Check if sessions do not overlap and are present in the conference schedule
    let sessionTimes = details.sessions.map(s => s.timeSlot);
    let sessionIds = details.sessions.map(s => s.id);

    if (new Set(sessionTimes).size !== sessionTimes.length) {
        isValid = false;
        message = 'Selected sessions have overlapping times.';
        return { isValid, message };
    }

    // Check if selected sessions exist in the conference schedule
    const sessionExists = sessionIds.every(id =>
        schedule.some(session => session.id === id));

    if (!sessionExists) {
        isValid = false;
        message = 'One or more selected sessions do not exist in the conference schedule.';
        return { isValid, message };
    }

    return { isValid, message };
}
conferenceScheduleArray: This array simulates the conference's schedule, listing all available sessions with their IDs, titles, and time slots. It serves as a reference for validating the user's selected sessions against the sessions offered at the conference.registrationDataObject: Represents a mock-up of a user's registration form submission for testing purposes. It includes user details such as name, email, and session preferences. In a live environment, this data would come from the user's form submission (req.body).Azure Function (
module.exports): The main entry point for processing workshop registration requests. It handles incoming HTTP requests, performs validation throughvalidateRegistrationDetails, and returns a response indicating the outcome of the registration process.validateRegistrationDetails(details, schedule)Function: Conducts comprehensive checks on the registration details against the conference schedule. It ensures all required fields are present, sessions selected by the participant do not overlap in time, and all chosen sessions are available according to the conference schedule.Validation Logic:
Required Fields Check: Verifies that essential information such as name, email, and session selection has been provided.
Session Overlap Check: Ensures that the selected sessions do not have overlapping times, which would be impossible for a single participant to attend.
Session Existence Check: Confirms that each session selected by the participant actually exists in the
conferenceSchedule, ensuring users only register for available sessions.
Response Preparation: Upon successful validation, a confirmation message is prepared and sent back to the user.
This case study showcases the flexibility and strength of Azure Functions in solving real-world challenges. By leveraging serverless computing and email automation, the conference organizers were able to offer a user-friendly, efficient, and effective registration system.
Testing the Function Locally
Having established our registration Function within Azure Functions, particularly within the context of our tech conference case study, it's essential to ensure its reliability and efficiency through rigorous local testing. This phase is vital for identifying and rectifying potential issues before deployment.
Local Testing Environment Setup
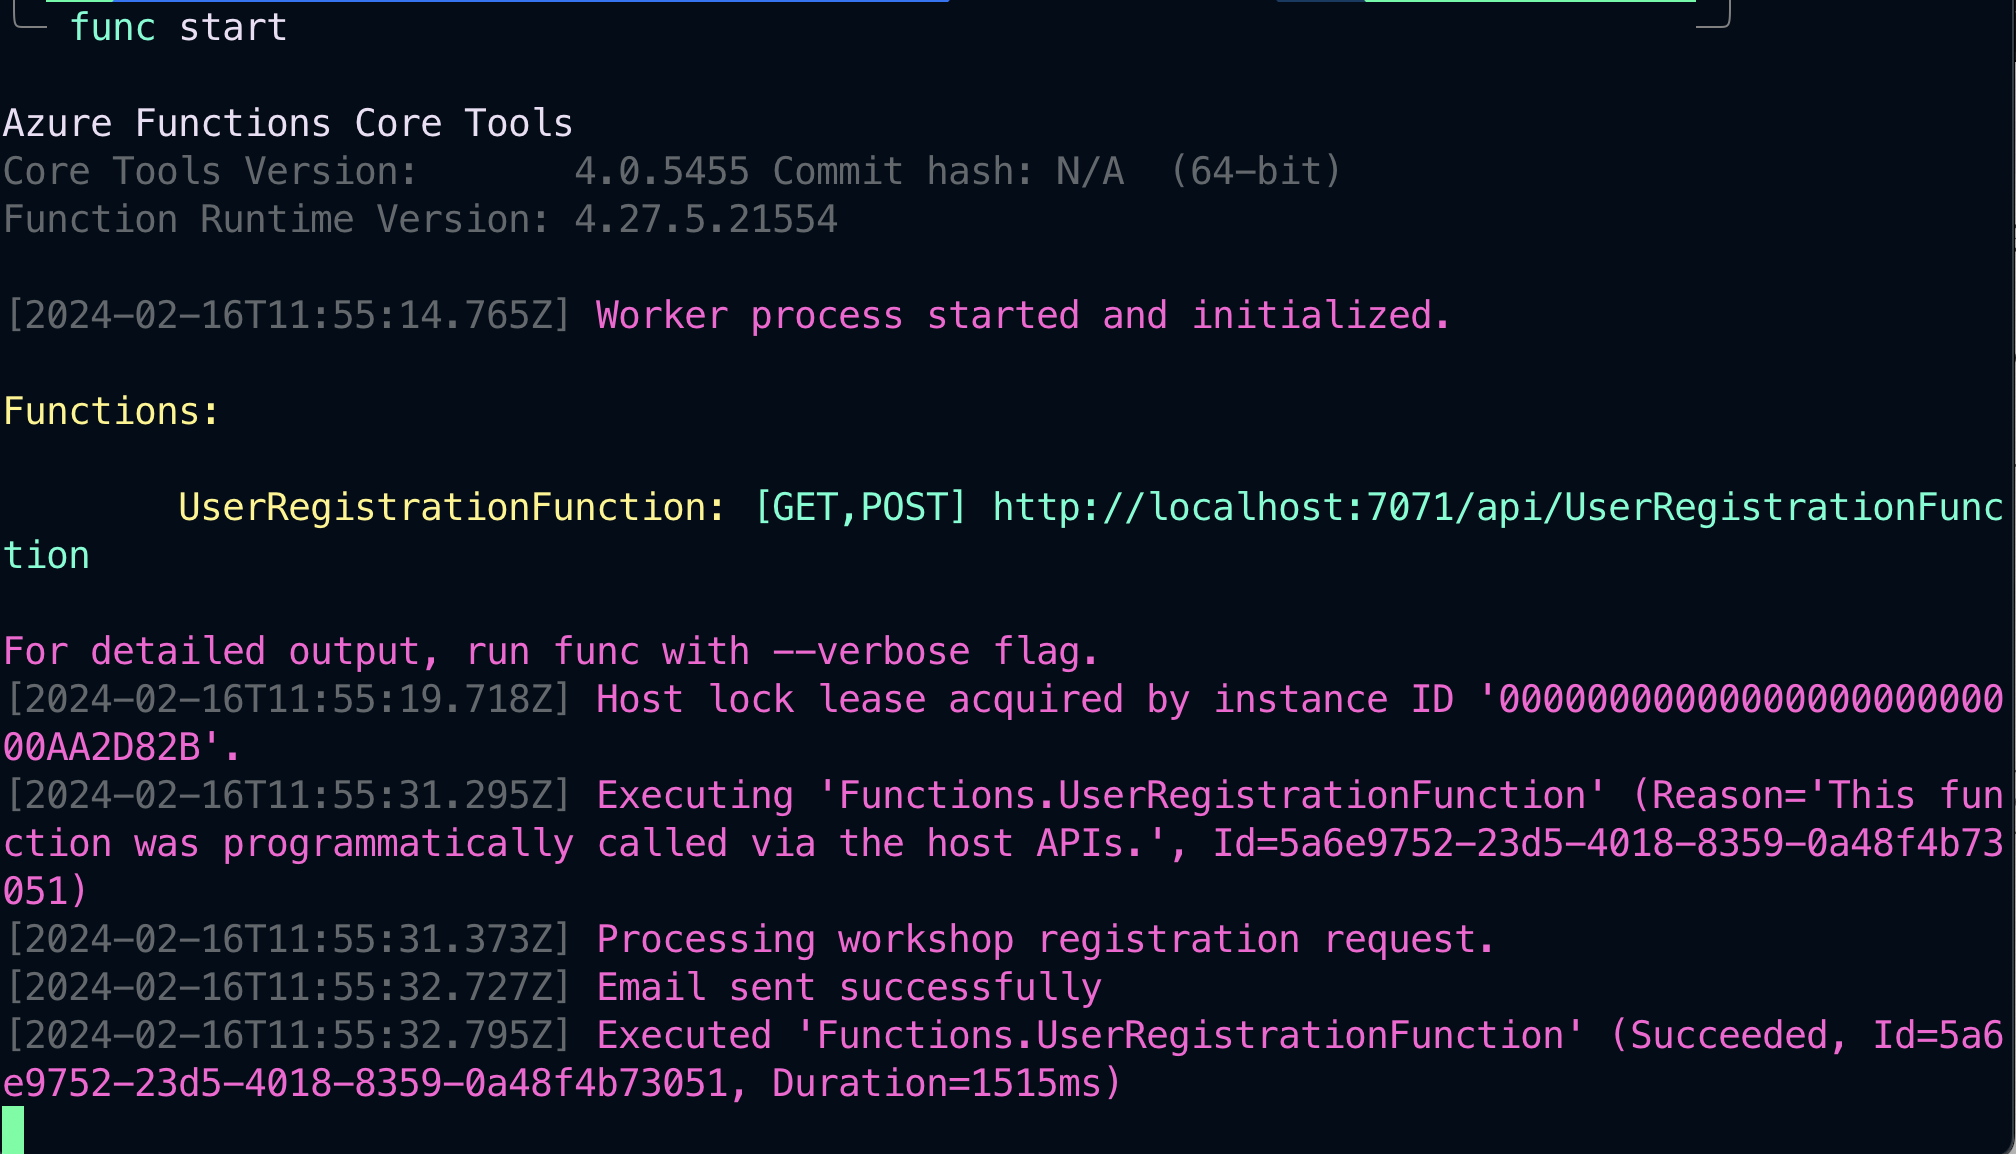
Use the Azure Functions Core Tools by issuing the
func startcommand to activate your Function App locally. This action initializes the server, setting the stage for it to accept incoming HTTP requests.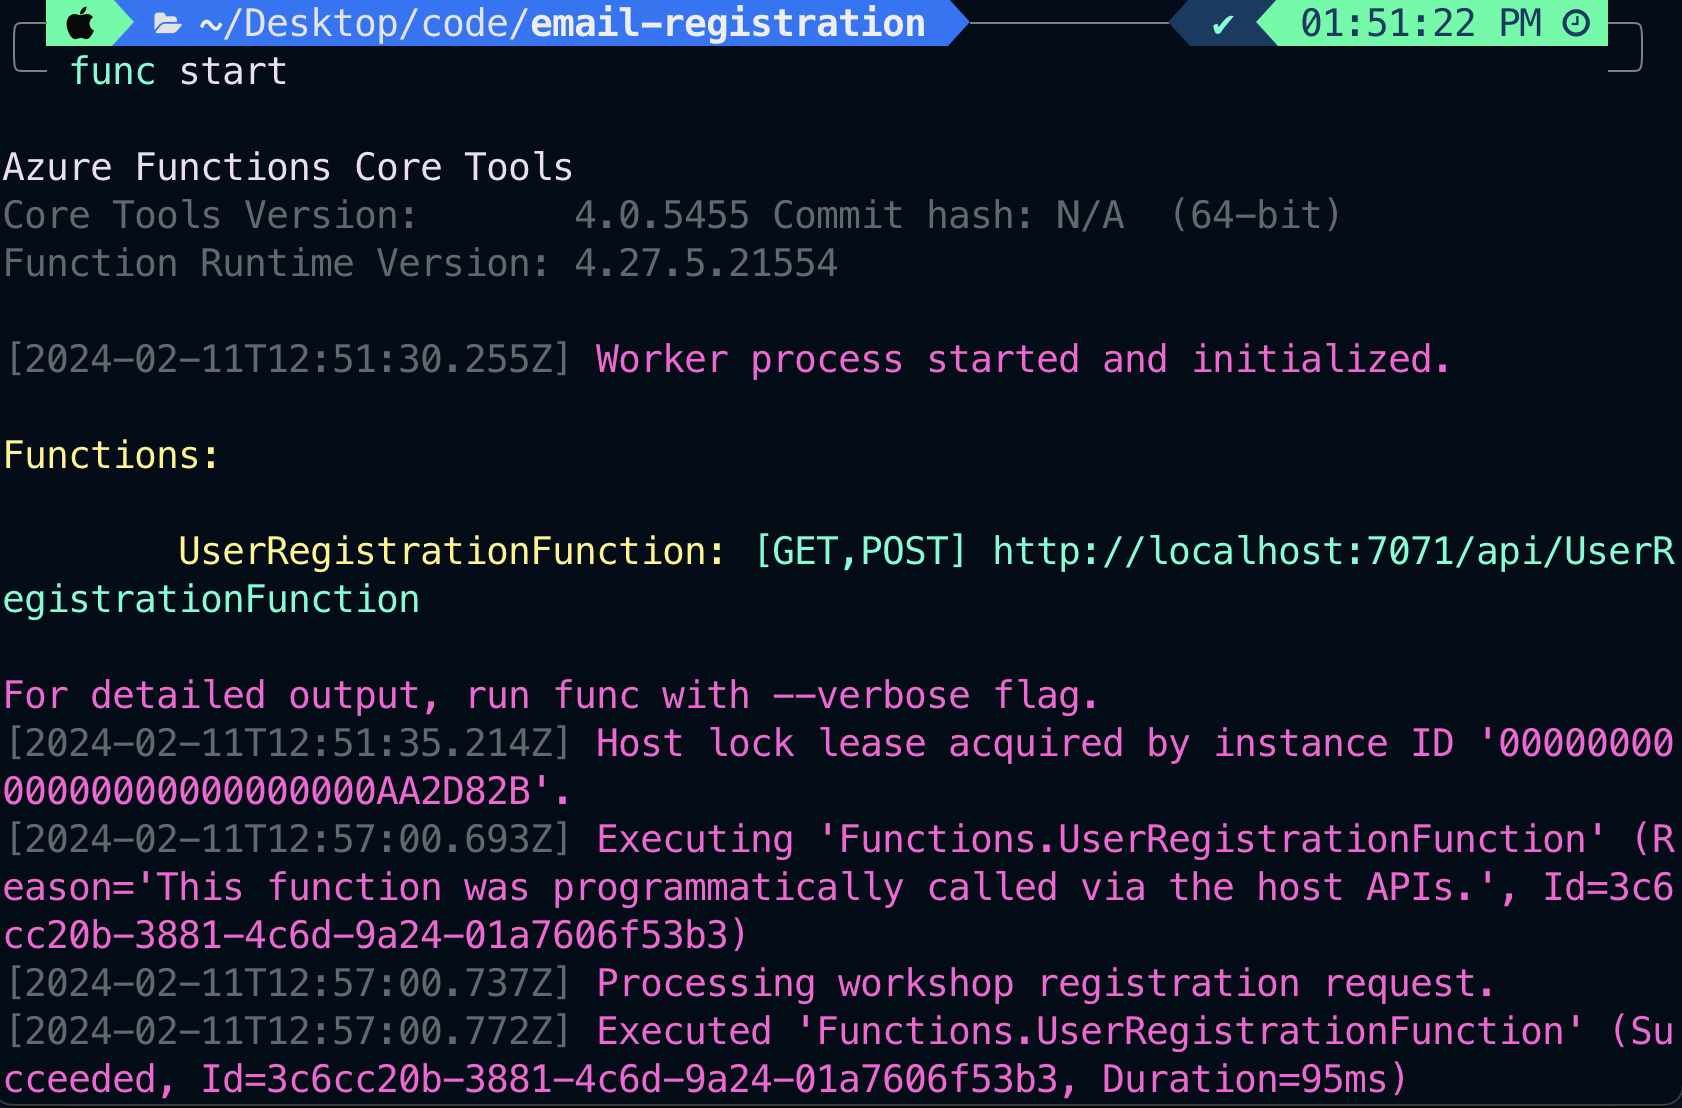
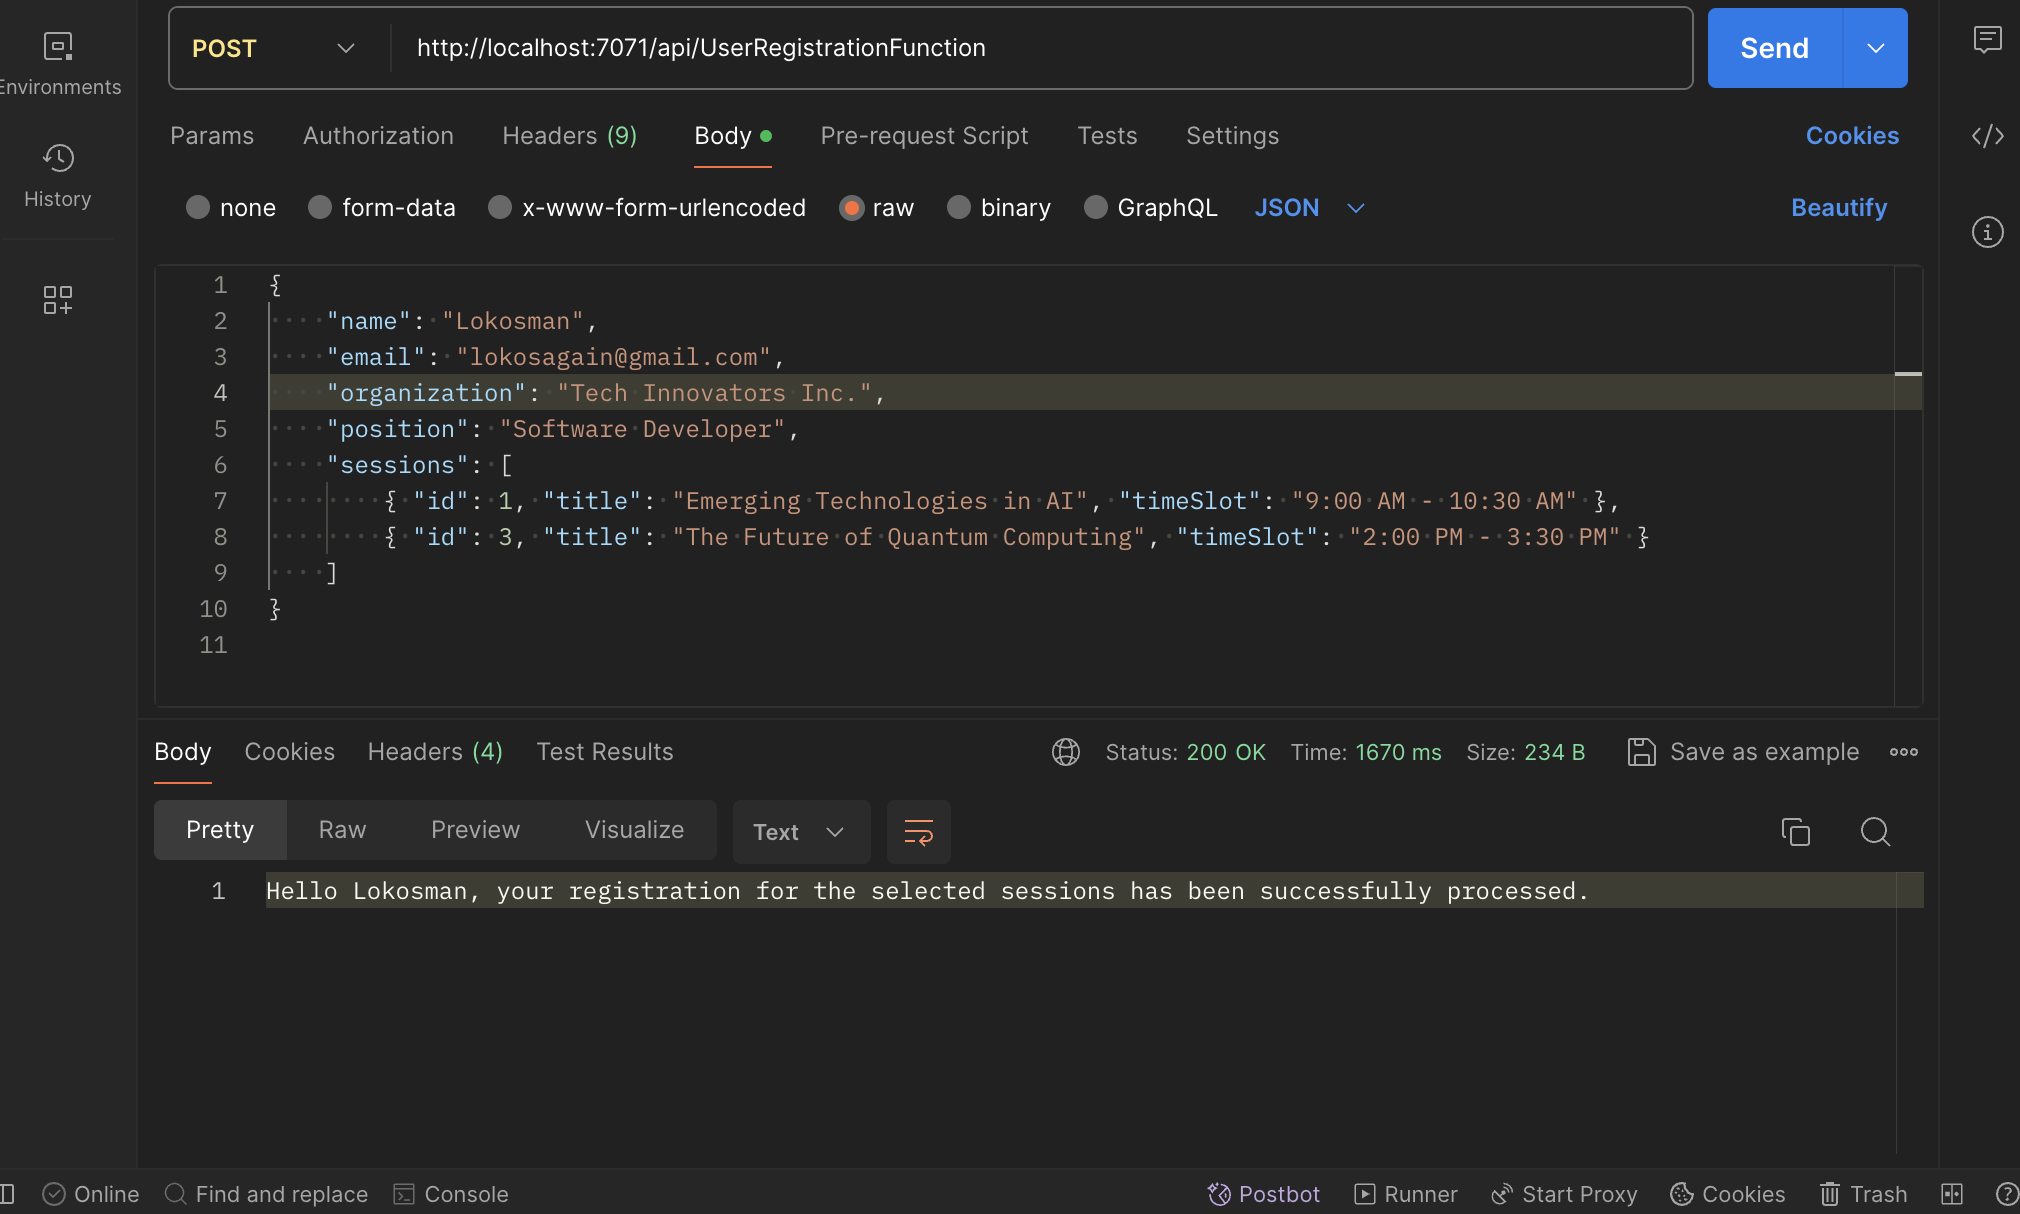
Utilize Postman, a dynamic API testing tool, to create simulated user registration requests. This essential step tests the Function's ability to manage and process data efficiently. To do this:
Copy the URL
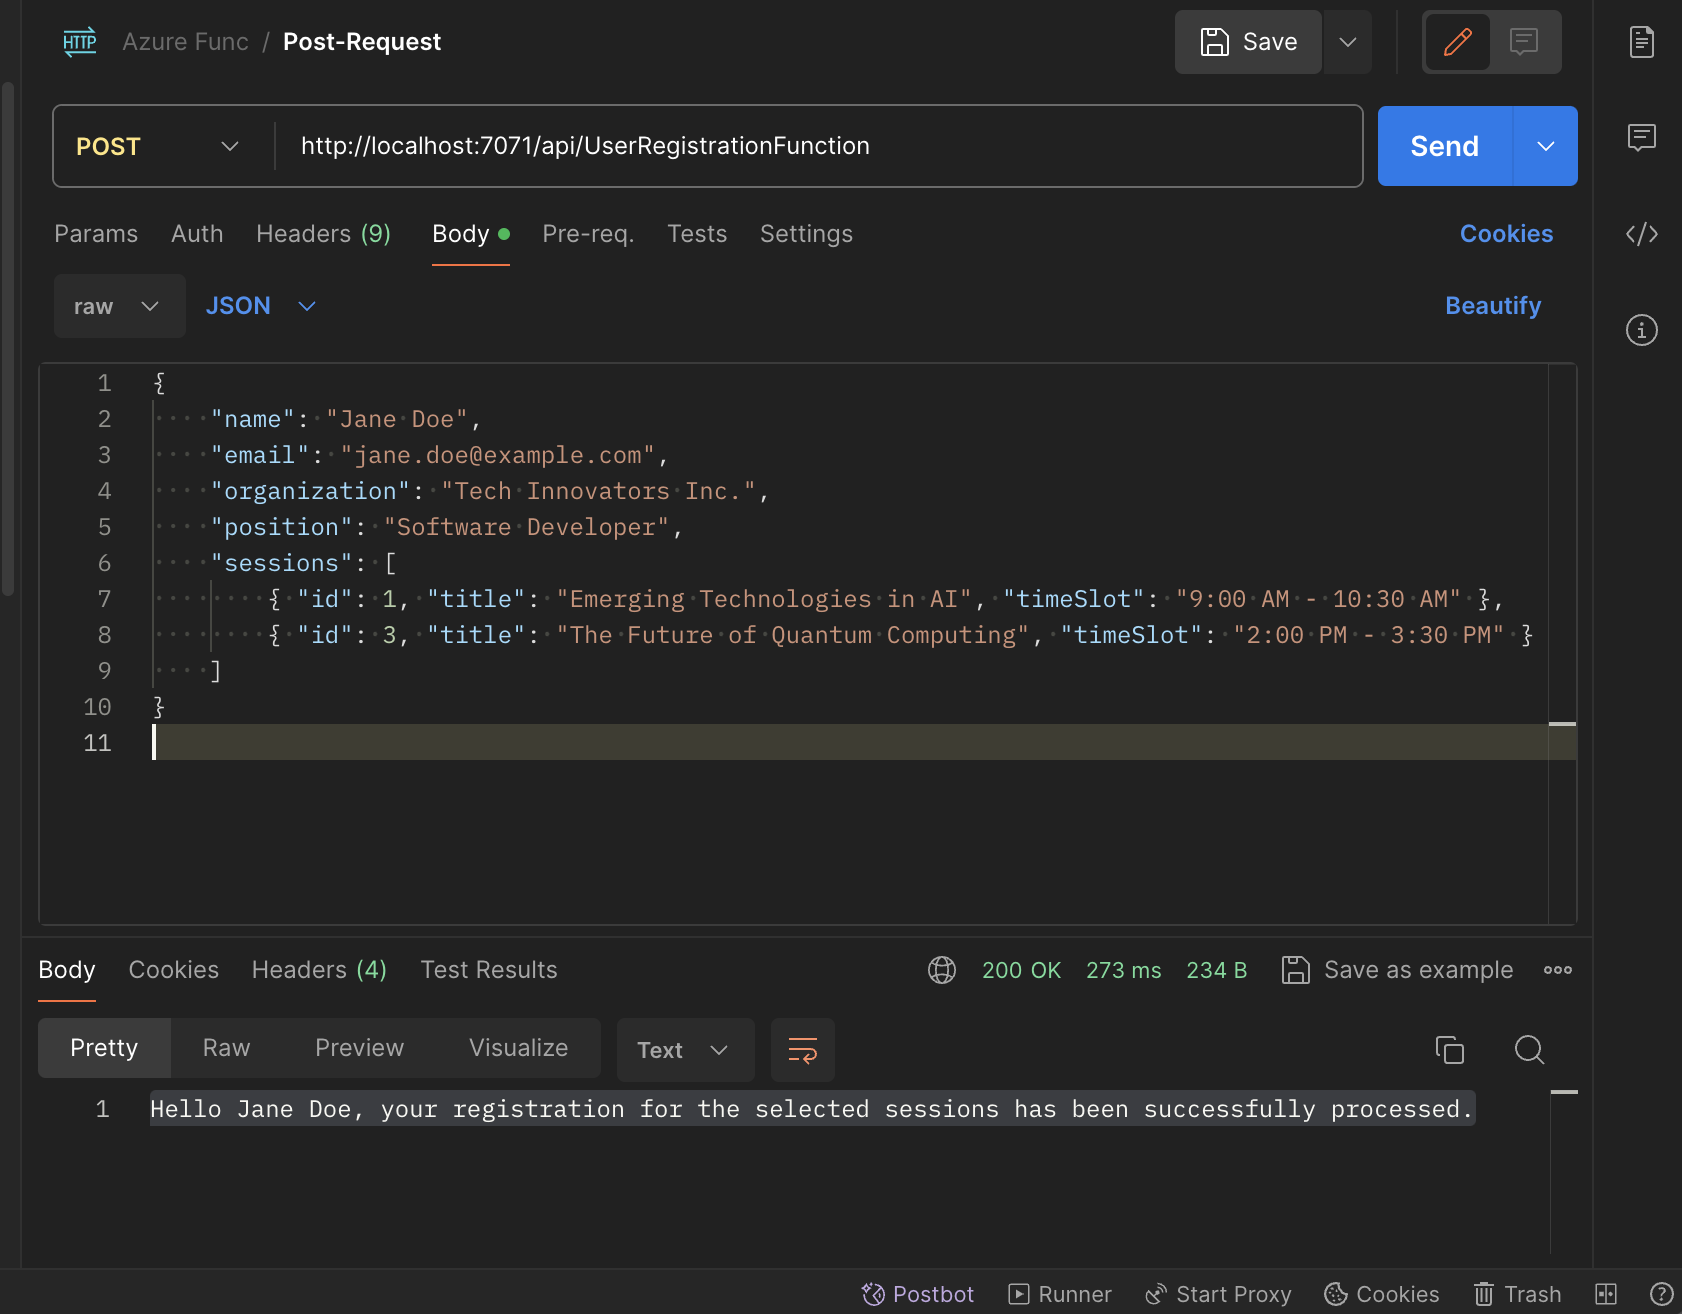
http://localhost:7071/api/UserRegistrationFunction.Paste it into the address bar in Postman.
Ensure the method is set to
POST.Select Body and add this json request to the body
 {
     "name": "Jane Doe",
     "email": "jane.doe@example.com",
     "organization": "Tech Innovators Inc.",
     "position": "Software Developer",
     "sessions": [
         { "id": 1, "title": "Emerging Technologies in AI", "timeSlot": "9:00 AM - 10:30 AM" },
         { "id": 3, "title": "The Future of Quantum Computing", "timeSlot": "2:00 PM - 3:30 PM" }
     ]
 }
Hit the "Send" button to carry out the request.
Local testing requires duplicating registration requests to confirm various aspects:
Reception and Processing: The Function must carefully receive and handle the registration data.
Validation Routines: Your validation logic should accurately separate valid from invalid inputs.
Response Generation: Suitable responses should be produced depending on the data validation results.
Debugging Strategies and Best Practices
The accurate measure of a Function's quality lies in its ability to execute tasks and effectively handle errors.
Effective Logging: Solid logging practices are vital in monitoring your Function's performance and pinpointing issues. Azure Functions offers comprehensive logging features that are readily accessible from your local setup or the Azure portal.
Troubleshooting Techniques: If you encounter issues, start with the logs. Look for exceptions, timeouts, or binding errors. Use the debugging tools in your IDE to set breakpoints and inspect variables where the logs indicate there may be a problem.
By thoroughly testing the Function locally, we can confidently move forward, knowing our system is robust enough to handle accurate user registrations. This step involves technical verification and building trust in the system's capabilities.
Integrating SendGrid for Email Automation
Once the registration Function has been verified for accuracy through local testing, the following step involves using SendGrid's functionality to automate email responses. This crucial phase aims to improve the user experience by immediately delivering tailored confirmation emails upon successful registration.
Setting Up SendGrid in the Project
Before we go into the code, it's essential to configure SendGrid to work with our Azure Function. This begins with obtaining an API key from SendGrid to authenticate our email-sending requests.
Log In to the SendGrid Portal: Navigate to the SendGrid website and log in to your account. You'll need to create an account if you don't have one.

Access the API Keys Section: Find the 'API Keys' section in the dashboard once logged in. This is typically located under 'Settings'.

Create a New API Key: Click the 'Create API Key' button.

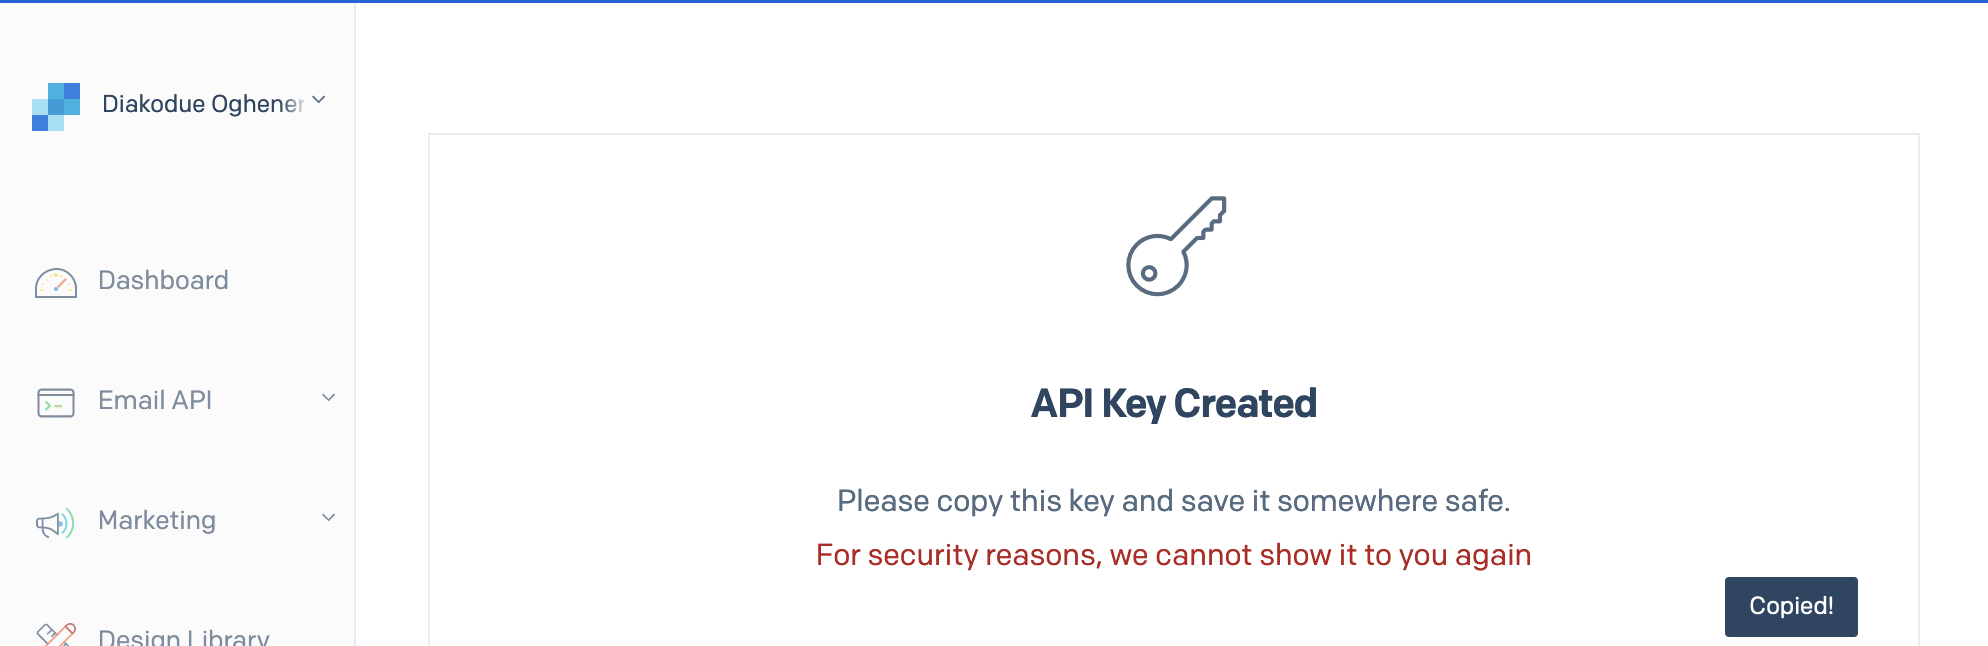
Set API Key Permissions: When prompted, give your API key a name that helps you remember its purpose, such as 'AzureFunctionsEmail; choose the appropriate permissions for your API key. For sending emails, 'Full Access' to mail-send operations is required.
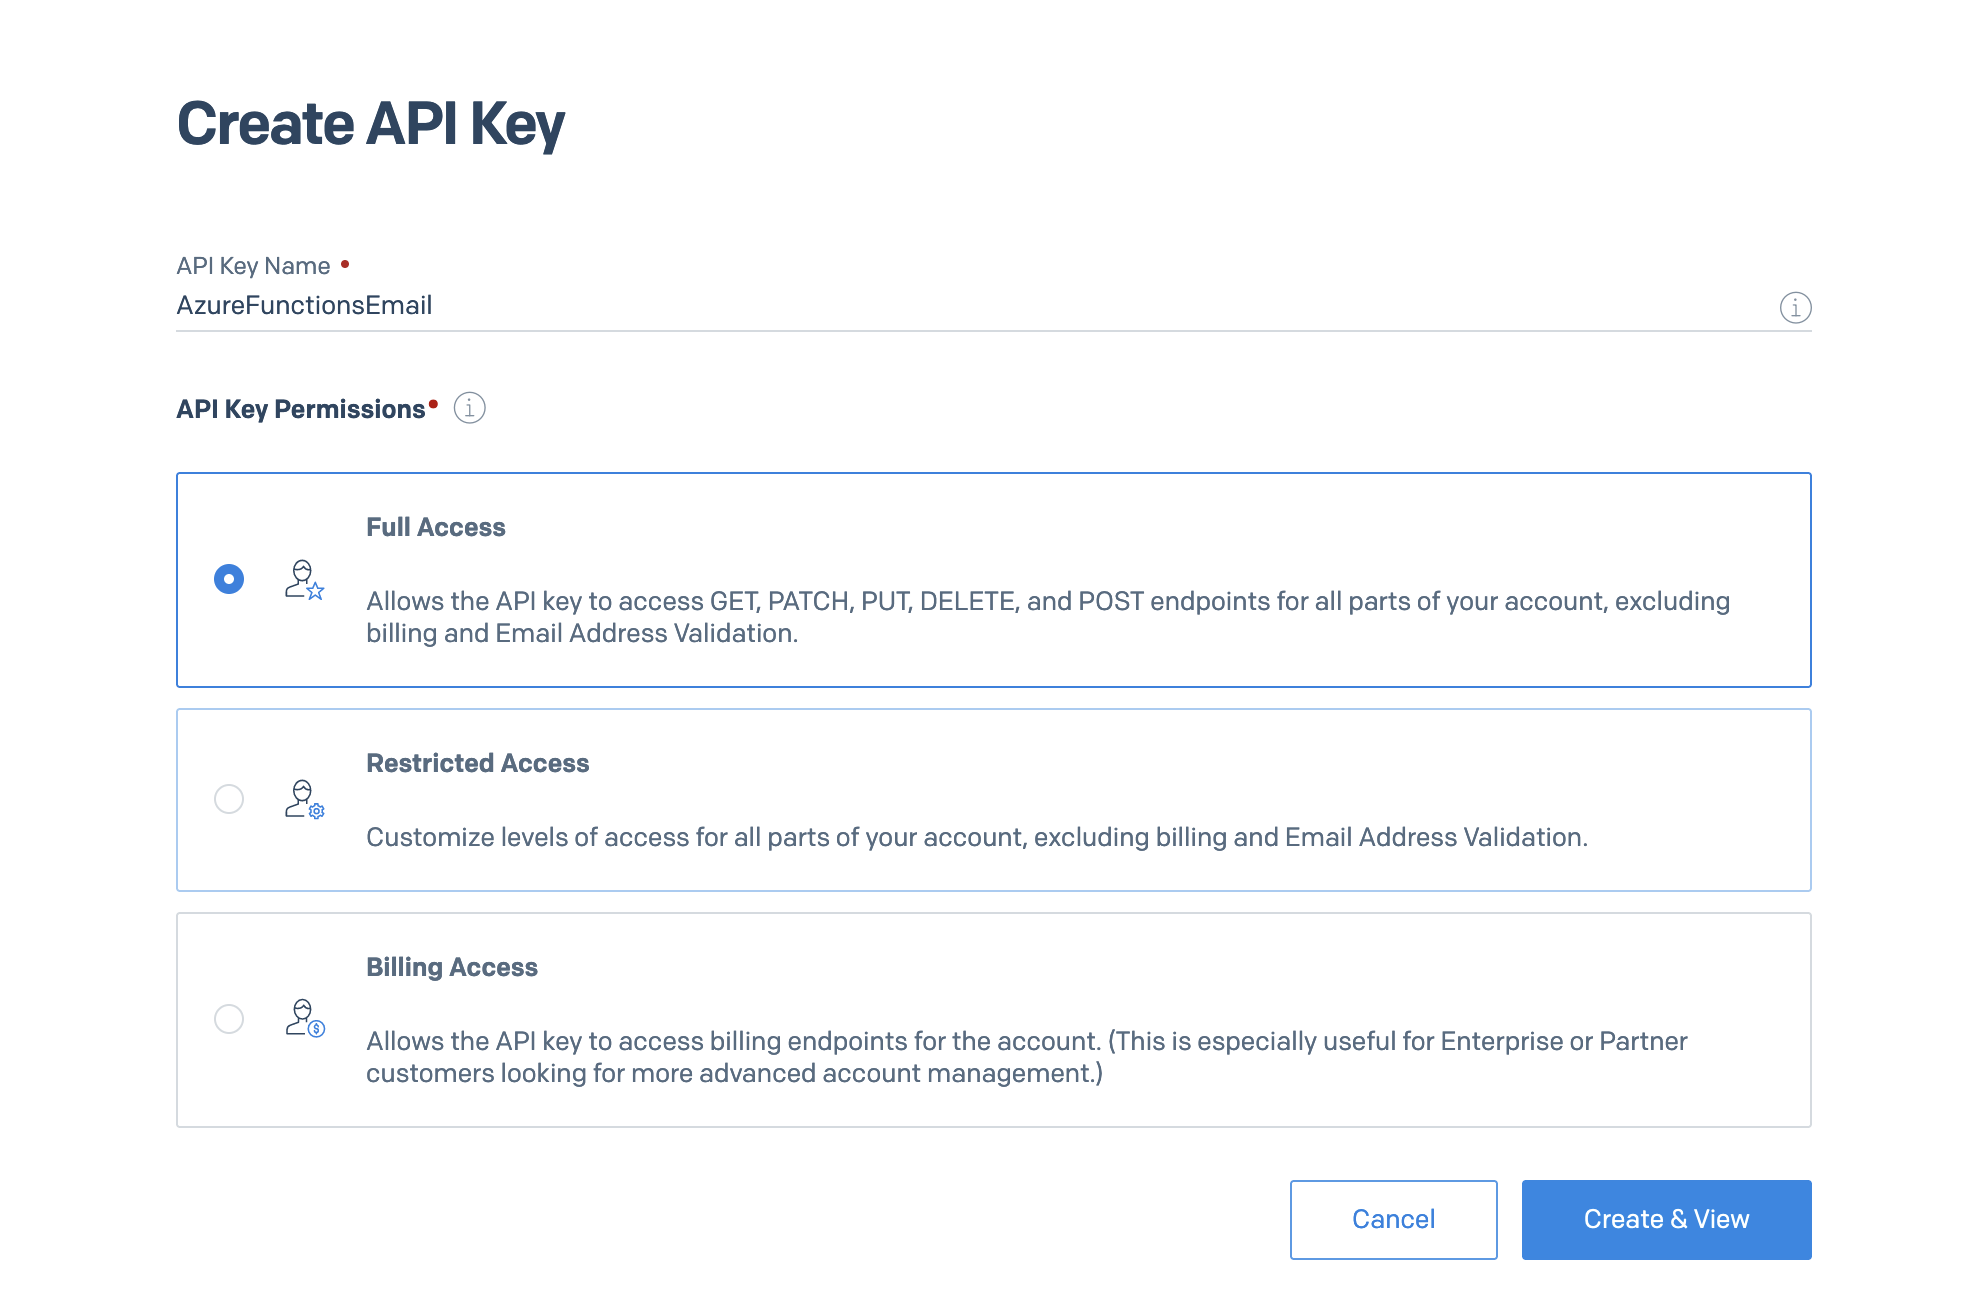
Save Your API Key: Your API key will be displayed after creation. Make sure to copy and save it securely; you won't be able to see it again.
Add the SendGrid API Key to Your Project's Configuration
Ensuring the secure handling of sensitive information, such as the SendGrid API key, is essential in Preserving the integrity and security of your email registration system. This section details adding the SendGrid API key to your project's configuration.
Management of Environment Variables Using
dotenvPackage:The
dotenvpackage should be added to your project to enable loading environment variables from a.envfile into your Node.js application. Execute the following command in your terminal:npm install dotenvAt the top of your
index.js, initializedotenvTo load the variables:require('dotenv').config();
Secure Storage via a
.envFile Creation:A
.envfile should be created within the root directory of your project. This file stores sensitive configuration details, such as the SendGrid API key, separate from your source code.The code below should be added inside
.envfile:SENDGRID_API_KEY=your_sendgrid_api_keyReplace
your_sendgrid_api_keywith the actual API key provided by SendGrid.
Utilizing the API Key within Azure Functions:
- Within your Azure Function, reference the SendGrid API key securely by using
process.env.SENDGRID_API_KEY. This method ensures the API key is securely managed and accessed, keeping it separate from your Function's codebase.
- Within your Azure Function, reference the SendGrid API key securely by using
By following these guidelines, you effectively add the SendGrid API key to your project's configuration, ensuring it is managed securely and in accordance with best practices.
Install the SendGrid NPM Package
To integrate SendGrid's email capabilities into your Azure Function, begin by installing the SendGrid Node.js package. This is achieved by installing the SendGrid Node.js package, which provides a convenient set of tools and methods to interact with SendGrid's API.
Open Your Terminal:
- Ensure you are in your project's root directory, where your Node.js application resides. You can move to your project directory using the terminal or command prompt with the
cdcommand.
- Ensure you are in your project's root directory, where your Node.js application resides. You can move to your project directory using the terminal or command prompt with the
Run the Installation Command:
To install the SendGrid Node.js package, execute the following command in your terminal:
npm install @sendgrid/mailThis command will download the SendGrid mail package from the npm repository and add it to your project's dependencies, making the Functions and methods provided by SendGrid available for use in your application.
Verify Installation:
- After installation, confirm that the SendGrid package is listed in your
package.jsonfile underdependencies. This verification step ensures that the package was successfully added to your project.
- After installation, confirm that the SendGrid package is listed in your
With the successfully installed SendGrid NPM package, your Azure Function is now equipped with the tools required to send emails, allowing you to effectively utilize SendGrid's robust email delivery services.
Email Logic Implementation
Having secured the SendGrid API key in your project's configuration and installed the SendGrid NPM package, you can now implement the email logic within your Azure Function. This phase involves utilizing the SendGrid package to send customized registration confirmation emails to users who have completed the registration process.
Import SendGrid's Mail Package
Initialization:
At the top of your
index.jsfile, add the following lines to import the SendGrid package and set it up with your API key:const sgMail = require('@sendgrid/mail'); sgMail.setApiKey(process.env.SENDGRID_API_KEY);
Assembling the Email Details
Define the Email Sending Function:
Within your Azure Function, create a Function named
sendRegistrationEmail. This Function will handle the task of emailing the user, leveraging the information they provided during registration.Implement
sendRegistrationEmailto accept an object containing the user's registration details as its parameter.
Email Composition:
In the
sendRegistrationEmailFunction: define the email message; include the recipient's email address, your verified SendGrid sender email, the email subject, and a personalized message body that confirms the registration and provides any additional details.async function sendRegistrationEmail(userDetails) { const msg = { to: userDetails.email, // Recipient's email from: 'noreply@yourdomain.com', // Your verified SendGrid sender subject: 'Registration Confirmation', text: `Hello ${userDetails.name}, thank you for registering. Here are your session details...`, // Personalized message }; try { await sgMail.send(msg); console.log('Email sent successfully'); } catch (error) { console.error('Error sending email:', error); } }
Integrating Email Functionality
Incorporating Email Sending into Registration Logic:
After successfully validating the registration details within your Azure Function, invoke
sendRegistrationEmail, passing in the registration details.This step should be placed appropriately to ensure that an email is only sent after confirming the registration is valid and before sending the final response to the user.
Handling Success and Errors:
Ensure proper error handling within the
sendRegistrationEmailFunction to gracefully manage any issues during the email-sending process, such as network issues or misconfiguration.module.exports = async function (context, req) { context.log('Processing workshop registration request.'); const registrationDetails = req.body || registrationData; // Validate registration details const validationResult = validateRegistrationDetails(registrationDetails, conferenceSchedule); if (!validationResult.isValid) { context.res = { status: 400, body: validationResult.message }; return; } //Send registration confirmation email await sendRegistrationEmail(registrationDetails); // Prepare a confirmation message to send back to the user const confirmationMessage = `Hello ${registrationDetails.name}, your registration for the selected sessions has been successfully processed.`; context.res = { status: 200, body: confirmationMessage }; };
Complete Integration Code
Having explored the steps required to secure the SendGrid API key in your project's configuration, install the SendGrid NPM package, and implement the email logic, we present the complete code. This code integrates all the components we've discussed, demonstrating how to send customized registration confirmation emails through Azure Functions using SendGrid.
This comprehensive example includes initializing the SendGrid package, validating registration details, and defining the sendRegistrationEmail Function. Additionally, it showcases how to incorporate this functionality within the Azure Function's workflow to enhance the registration process with automated email communications.
By integrating this functionality, your Azure Function processes registration requests and sends a confirmation email to users, leveraging SendGrid's robust email delivery services. This is an excellent demonstration of using serverless Functions for efficient and scalable email operations, significantly Improving the user experience by offering instant feedback on their registration status.
// Sample data structure for testing purposes.
// In production, remove the following mock data and ensure all data comes from the request body (req.body).
require('dotenv').config();
  const sgMail = require('@sendgrid/mail');
  sgMail.setApiKey(process.env.SENDGRID_API_KEY);
const conferenceSchedule = [
{ id: 1, title: "Emerging Technologies in AI", timeSlot: "9:00 AM - 10:30 AM" },
{ id: 2, title: "Learn Blockchain", timeSlot: "11:00 AM - 12:30 PM" },
{ id: 3, title: "The Future of Cloud computing", timeSlot: "2:00 PM - 3:30 PM" },
]
const registrationData = {
name: "Jane Doe",
email: "jane.doe@example.com",
organization: "Tech Innovators Inc.",
position: "Software Developer",
sessions: [
{ id: 1, title: "Emerging Technologies in AI", timeSlot: "9:00 AM - 10:30 AM" },
{ id: 2, title: "Learn Blockchain", timeSlot: "11:00 AM - 12:30 PM" },
],
};
async function sendRegistrationEmail(userDetails) {
// Generate session details string
let sessionDetailsString = userDetails.sessions.map(session => {
return `${session.title} - ${session.timeSlot}`;
}).join("\n");
const msg = {
to: userDetails.email,
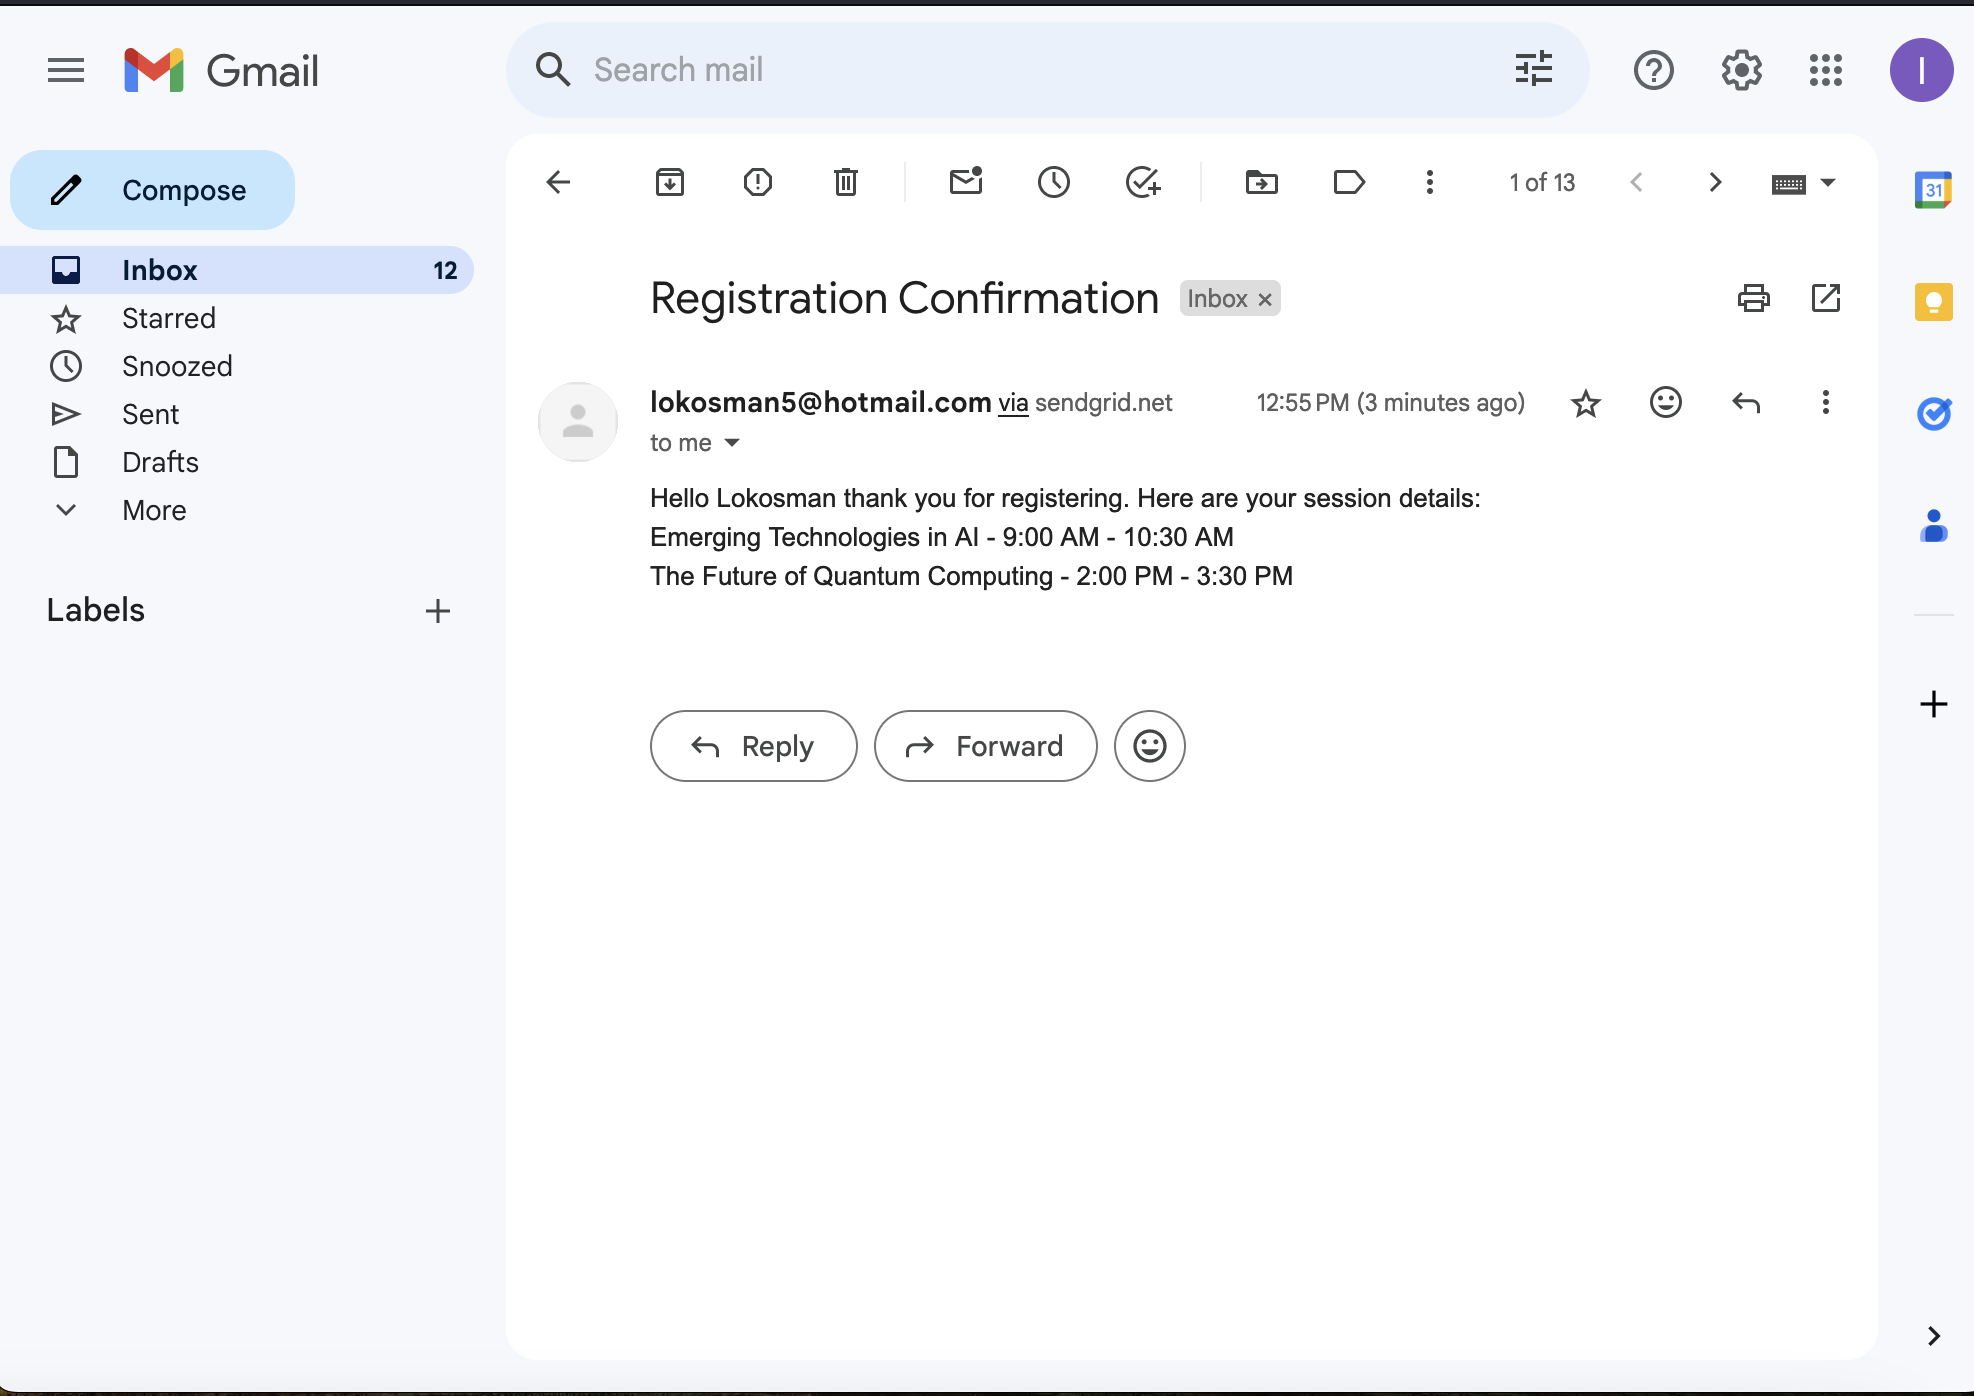
from: 'lokosman5@hotmail.com',
subject: 'Registration Confirmation',
text: `Hello ${userDetails.name} thank you for registering. Here are your session details: \n${sessionDetailsString}`
};
try {
await sgMail.send(msg);
console.log('Email sent successfully');
} catch (error) {
console.error('Error sending email: ', error);
}
}
  module.exports = async function (context, req) {
      context.log('Processing workshop registration request.');

      const registrationDetails = req.body || registrationData;

      // Validate registration details
      const validationResult = validateRegistrationDetails(registrationDetails, conferenceSchedule);
      if (!validationResult.isValid) {
          context.res = { status: 400, body: validationResult.message };
          return;
      }

      //Send registration confirmation email
      await sendRegistrationEmail(registrationDetails);

      // Prepare a confirmation message to send back to the user
      const confirmationMessage = `Hello ${registrationDetails.name}, your registration for the selected sessions has been successfully processed.`;

      context.res = {
          status: 200,
          body: confirmationMessage
      };
  };
function validateRegistrationDetails(details, schedule) {
let isValid = true;
let message = 'Registration details are valid.';
// Check if all required fields are present
if (!details.name || !details.email || !details.sessions || details.sessions.length === 0) {
isValid = false;
message = 'Missing required registration details: name, email, or sessions.';
return { isValid, message };
}
// Check if sessions do not overlap and are present in the conference schedule
let sessionTimes = details.sessions.map(s => s.timeSlot);
let sessionIds = details.sessions.map(s => s.id);
if (new Set(sessionTimes).size !== sessionTimes.length) {
isValid = false;
message = 'Selected sessions have overlapping times.';
return { isValid, message };
}
// Check if selected sessions exist in the conference schedule
const sessionExists = sessionIds.every(id =>
schedule.some(session => session.id === id));
if (!sessionExists) {
isValid = false;
message = 'One or more selected sessions do not exist in the conference schedule.';
return { isValid, message };
}
return { isValid, message };
}
Testing Email Functionality
Testing the email functionality locally is crucial to ensure your integration with SendGrid works as expected. This step verifies that emails are sent out correctly upon user registration.
Simulating User Registration: A tool like Postman should be used to simulate a registration request to your Azure Function, ensuring that valid test data, mimicking a real user's registration data, is provided.
Inspecting Function Logs:
When testing locally, observe the logs generated by your Azure Function to confirm that the email-sending process is triggered correctly. Look for any log entries indicating success or error responses from the SendGrid API.
Troubleshooting Common Issues:
- If emails aren't being sent as expected, verify that your SendGrid API key is correctly configured within your Azure Function's settings. Also, ensure the sender's email address is verified in your SendGrid account to avoid being blocked or filtered as spam.
Conclusion
With the development of the registration logic, local testing, and integration with SendGrid for email automation complete, we've made significant progress in building our automated email registration system. These steps ensure our system is functional and user-friendly, providing immediate value through personalized communication.
What to Expect in Part 3
In our concluding article, we will go into the final stages of bringing our automated email registration system to fruition:
Deploying to Azure: We'll provide detailed instructions on deploying our system to Azure, ensuring it's ready to handle real-world scenarios with efficiency and security.
Securing User Data: A step-by-step guide on selecting and integrating a database within Azure for secure and scalable user information storage.
Comprehensive Testing: Emphasizing the importance of thorough testing in the Azure environment, we'll cover strategies to test the system end-to-end, ensuring its reliability and performance.
Stay tuned as we take our email registration system to the next level, demonstrating the full capabilities of serverless architecture and email automation with Azure Functions and SendGrid.


